1984 ZX900R Restoration
#31
 01-17-2008, 05:30 AM


That stuff there is beyond my current mechanical capabilities. I'd like to be able to tear that kind of stuff apart and actually be able to put it back together correctly.

#33
02-02-2008, 09:11 PM

Duece,
This stuff is beyond my abilities until I do it. It's the first time I have really had a motor apart like this. It just takes a no guts no glory attitude and a williness to make mistakes. Oh and the right tools. The right tools are the difference between an hour job and a weekend job. All those people with busted knuckles...it's because they don't have the right tools. LOL. I will be steadily working on the putting it back together part. But putting it back to gether is easy if you know how you took it apart, notes, pictures and documentation. Pictures are worth a thousand words unless it of the wrong thing then it's only three..."WTF".
HoeDogg,
Enjoy....
Well I got my shop (mini garage) cleaned up and now I have a little more room.
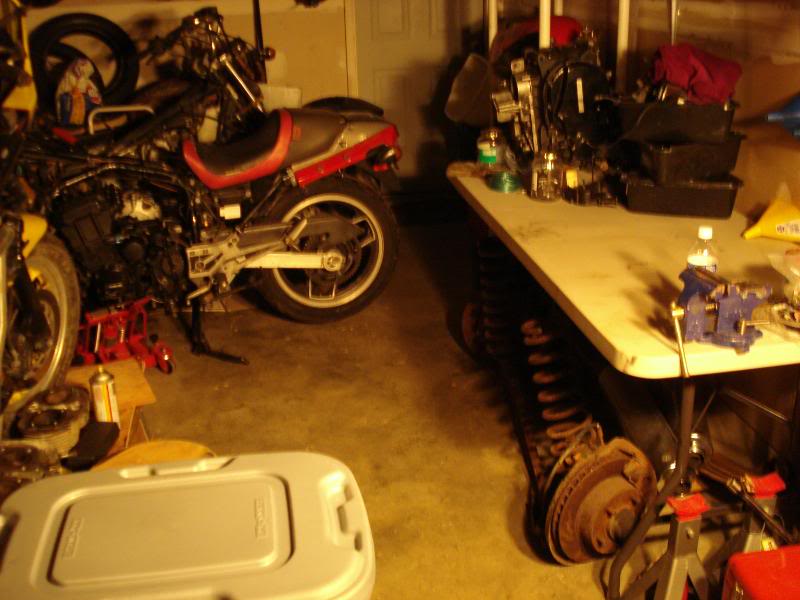
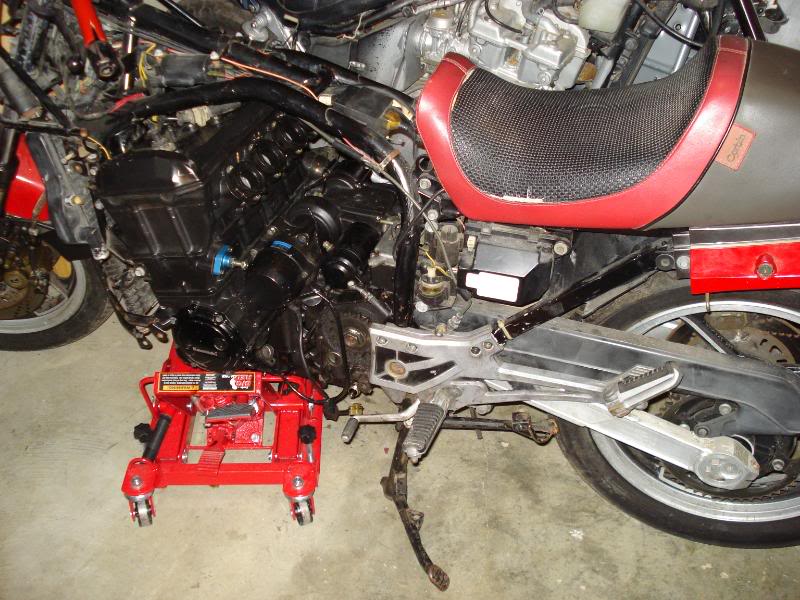
I removed the 1994 ZX-11 motor from the frame (so much fun...again).
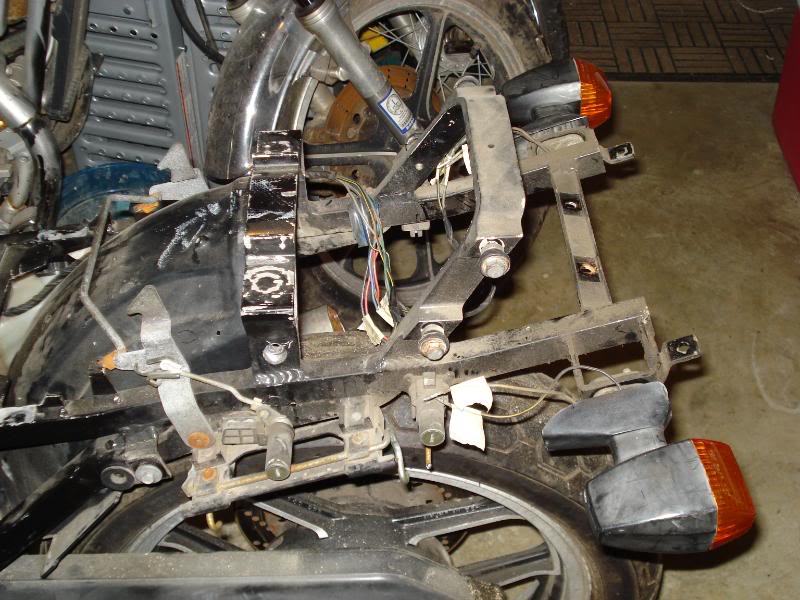
I also removed some of the rear body work so they wouldn't get damaged. I also found that the key for the seat release mechanism doesn't engage another "fix it" to my list.
I put the ZX-11 motor on my makeshift work bench(I.e.) a folding table with the injection molded top. (needless to say I don't think the top will be level ever again.)
I removed the oil pan and limited components I assembled on to the motor so it didn't leak when it was in the bike.
I also tried to test the gears shifting by using an old KZ650 shifter, it worked to my content but there were problems. I found later that there was a piece of the casing (from when it threw a rod) that was holding it up.
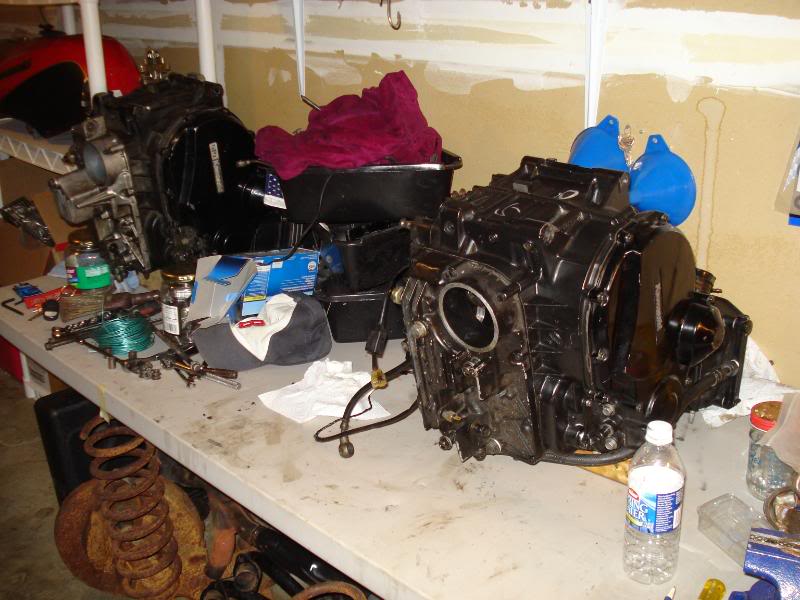
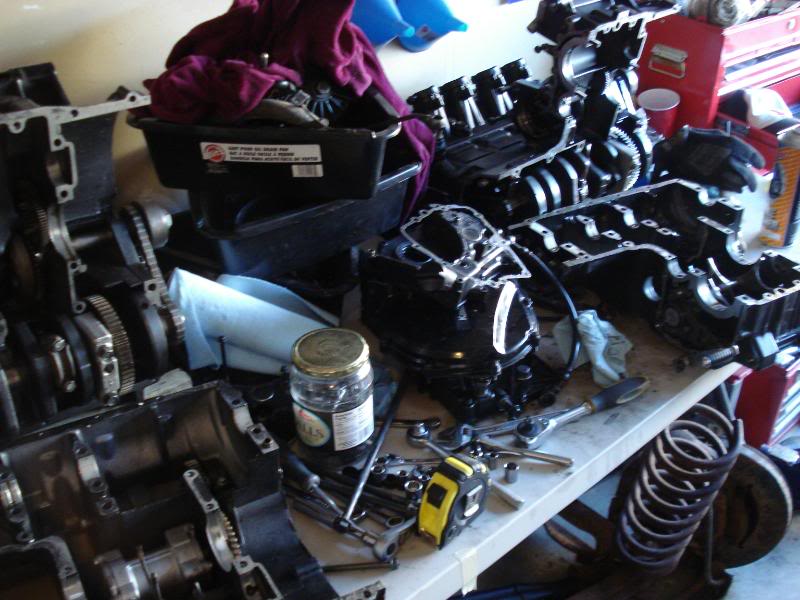
I Cracked both cases and removed the transmission from the ZX-11. My objective is to determine the differences between the two transmissions and if possible, what combination of the two transmissions can be joined to create one working one.
Major differences noticed right away
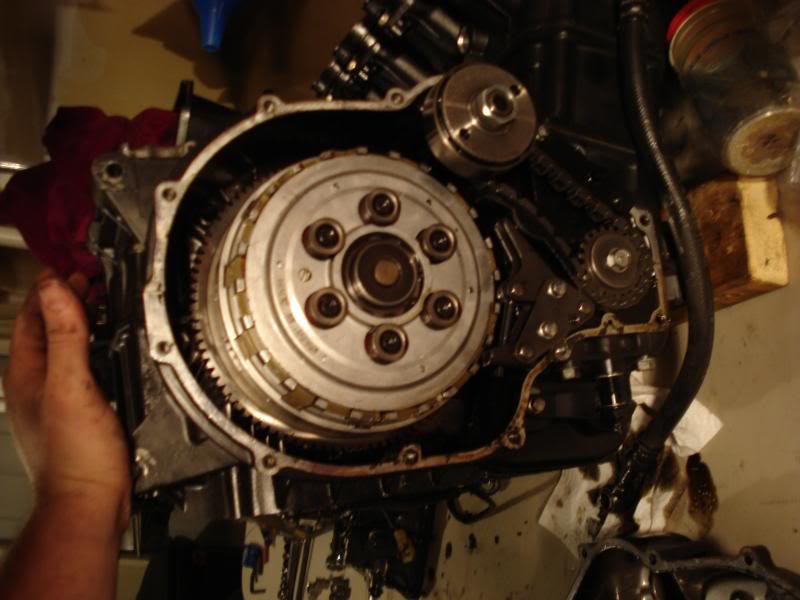
1. ZX900 - 5 Clutch Springs about 6 clutch disc's ZX-11 6 clutch springs and about 8 disc's.
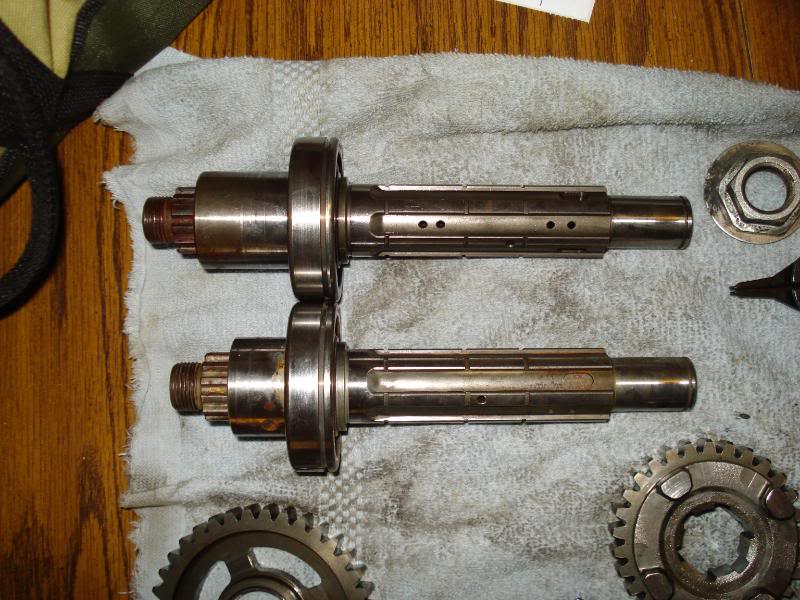
2. The output shaft on the ZX-11 is about 1/4 in longer than the ZX900. This means that the sprocket would be offset and the chain would not align. Without searching for an answer I'll chaulk it off to having a different rim and tire combination. Otherwise everything looked to be identical. Time to count gear teeth...
3. The shifter mechanism had a number of differences. but it seemed to function the same.
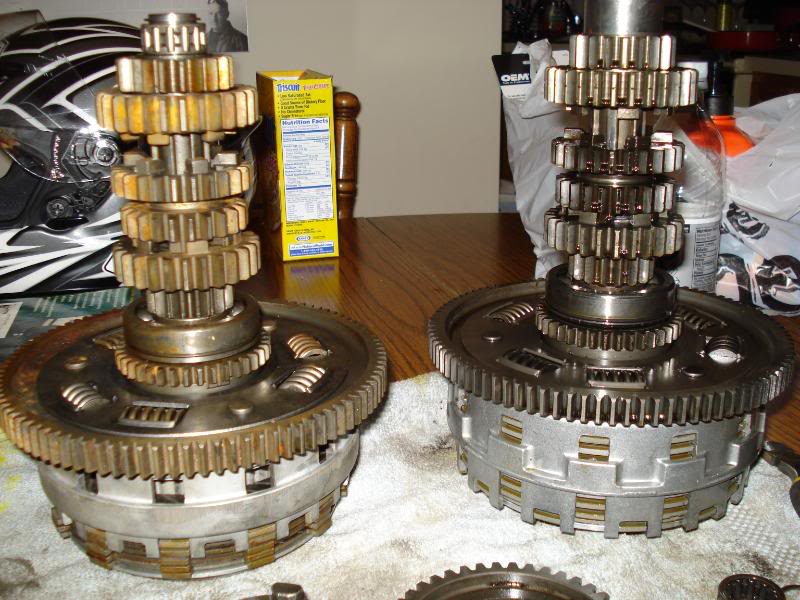
I counted all the teeth and the only sprockets that were different were second gear, which I remember seeing somthing in the manual about it being different for some of the ZX1000. I think as long as the gears are matched on the input and output shaft, the shift drum has the correct cadence and dog engagment offset there should be no difference in the transmissions other than the increased clutch grip and the second gear ratio. Now the proof is in the pudding and I won't know if there are any clearance issues with the clutch cover.
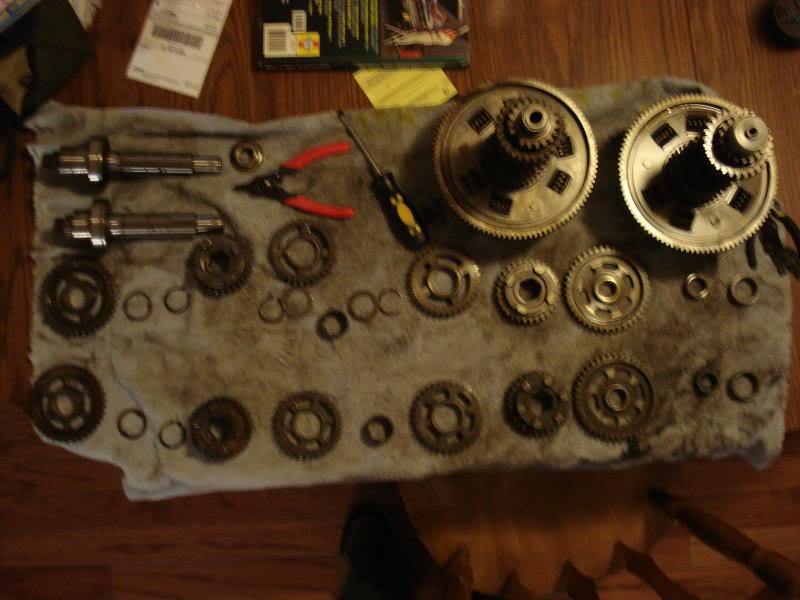
I guess it's time for another list tricks and/or tips:
1. Keep the tranny oiled or you will end up with oxidation, which is no good and can fall off scratch piston walls, clog up oil filters etc. Keep it oiled so you don't have to clean it.
2. Circlip pliers are your friend, get a set.
3. take lots of reference pictures, because you won't know how it goes back together...just trust me.
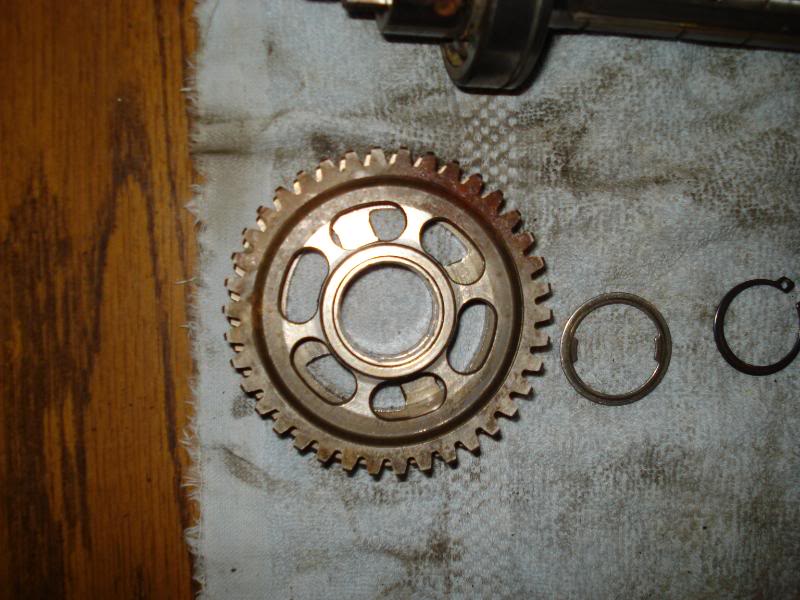
4. Counting gear teeth is not the only way to verify differences in the pinions, it is just the most obvious. Check inner and outer diameter of the gear teeth, dog hole profile (check the pictures for subtle differences).
5. Check all your bearings, if it sounds like a skateboard wheel, it probably is good for just that, but it doesn't go back in your motor. I have to change the shaft bearing on the output shaft because there is way too much play.
6. remember which side of the pinion goes on first and in what order. They may seem right and will catch when you move them back and forth on the shaft, but it's a world of difference when the shifter forks are doing it in a certain order.
7. I did a no no when I tried to check to see if it would run through the gears. You will need to make sure the tranny is in neutral when doing the final assembly.
8. Be careful when taking pinions off the shaft, some of them have little ball bearings in them.
9. There are many holes in the shaft for oil librication. Make sure all the holes are lined up properly
10. sometimes the collars that the pinions ride on are tough to get on and off the shaft. I took the shaft and hit it on the anvil side of my vise. If you try and take it off with pliers, you will mar the surface the pinions ride on possibly causing excess friction, premature wear, or catastrofic nothing. I prefer smooth surfaces for my pinions. Also keep the pry bar away from the gears.
Well, I have some trouble to get into tonight so enjoy and as always questions and comments are always welcome.
Cheers!
This stuff is beyond my abilities until I do it. It's the first time I have really had a motor apart like this. It just takes a no guts no glory attitude and a williness to make mistakes. Oh and the right tools. The right tools are the difference between an hour job and a weekend job. All those people with busted knuckles...it's because they don't have the right tools. LOL. I will be steadily working on the putting it back together part. But putting it back to gether is easy if you know how you took it apart, notes, pictures and documentation. Pictures are worth a thousand words unless it of the wrong thing then it's only three..."WTF".
HoeDogg,
Enjoy....
Well I got my shop (mini garage) cleaned up and now I have a little more room.
I removed the 1994 ZX-11 motor from the frame (so much fun...again).
I also removed some of the rear body work so they wouldn't get damaged. I also found that the key for the seat release mechanism doesn't engage another "fix it" to my list.
I put the ZX-11 motor on my makeshift work bench(I.e.) a folding table with the injection molded top. (needless to say I don't think the top will be level ever again.)
I removed the oil pan and limited components I assembled on to the motor so it didn't leak when it was in the bike.
I also tried to test the gears shifting by using an old KZ650 shifter, it worked to my content but there were problems. I found later that there was a piece of the casing (from when it threw a rod) that was holding it up.
I Cracked both cases and removed the transmission from the ZX-11. My objective is to determine the differences between the two transmissions and if possible, what combination of the two transmissions can be joined to create one working one.
Major differences noticed right away
1. ZX900 - 5 Clutch Springs about 6 clutch disc's ZX-11 6 clutch springs and about 8 disc's.
2. The output shaft on the ZX-11 is about 1/4 in longer than the ZX900. This means that the sprocket would be offset and the chain would not align. Without searching for an answer I'll chaulk it off to having a different rim and tire combination. Otherwise everything looked to be identical. Time to count gear teeth...
3. The shifter mechanism had a number of differences. but it seemed to function the same.
I counted all the teeth and the only sprockets that were different were second gear, which I remember seeing somthing in the manual about it being different for some of the ZX1000. I think as long as the gears are matched on the input and output shaft, the shift drum has the correct cadence and dog engagment offset there should be no difference in the transmissions other than the increased clutch grip and the second gear ratio. Now the proof is in the pudding and I won't know if there are any clearance issues with the clutch cover.
I guess it's time for another list tricks and/or tips:
1. Keep the tranny oiled or you will end up with oxidation, which is no good and can fall off scratch piston walls, clog up oil filters etc. Keep it oiled so you don't have to clean it.
2. Circlip pliers are your friend, get a set.
3. take lots of reference pictures, because you won't know how it goes back together...just trust me.
4. Counting gear teeth is not the only way to verify differences in the pinions, it is just the most obvious. Check inner and outer diameter of the gear teeth, dog hole profile (check the pictures for subtle differences).
5. Check all your bearings, if it sounds like a skateboard wheel, it probably is good for just that, but it doesn't go back in your motor. I have to change the shaft bearing on the output shaft because there is way too much play.
6. remember which side of the pinion goes on first and in what order. They may seem right and will catch when you move them back and forth on the shaft, but it's a world of difference when the shifter forks are doing it in a certain order.
7. I did a no no when I tried to check to see if it would run through the gears. You will need to make sure the tranny is in neutral when doing the final assembly.
8. Be careful when taking pinions off the shaft, some of them have little ball bearings in them.
9. There are many holes in the shaft for oil librication. Make sure all the holes are lined up properly
10. sometimes the collars that the pinions ride on are tough to get on and off the shaft. I took the shaft and hit it on the anvil side of my vise. If you try and take it off with pliers, you will mar the surface the pinions ride on possibly causing excess friction, premature wear, or catastrofic nothing. I prefer smooth surfaces for my pinions. Also keep the pry bar away from the gears.
Well, I have some trouble to get into tonight so enjoy and as always questions and comments are always welcome.
Cheers!
#35
02-09-2008, 10:06 PM
Thanks Dragone, there will be more.
I ended up ordering a set of gears on ebay. The bearing on the input shaft was bad and sounded like a roller skate. I don't have a press at the moment to remove the bearing, so my best bet was to just find one for cheap. Although now we know that it is pretty easy to scavange gears from another big bore ninja.
I have had some other projects that have come in a 1967 mustang and a 2000 CR80R. I am also waiting to sell the ZX-11 parts on ebay to get the funds to keep the ZX900 project from stalling.
I am also looking into Harbor Freight. They have some basic standing presses that are economical, so I think I might get one just to have.
More soon.
Cheers!
#38
07-06-2008, 02:50 AM
Dragone,
Thanks again.
I guess an update is in order. Well, in the last 5 months, got a gf lost a gf and in that time motorcycles were a little less of a priority...You all know how it goes.
As for the GPz, I have determined that a complete rebuild is in order for the motor. I have rebuilt a two stroke Honda and a KZ750 I finishing up now, so I am not as shy about rebuilding motors from the bottom up anymore. But cleaning gasket surfaces has now become a not so enjoyable past time. By rebuild, I mean all new gaskets, cleaning up the head ports, making sure everything is in order. I just want to be able to ride it and enjoy it. It is next in line after the KZ750.
I have secured the bottom end gasket set, but I ran into the $90 head gasket and was a little hesitant I will be bucking up here shortly for it. I have learned alot from rebuilding the KZ750 (which is why I did it first) and i will be able to more efficiently rebuild the 900.
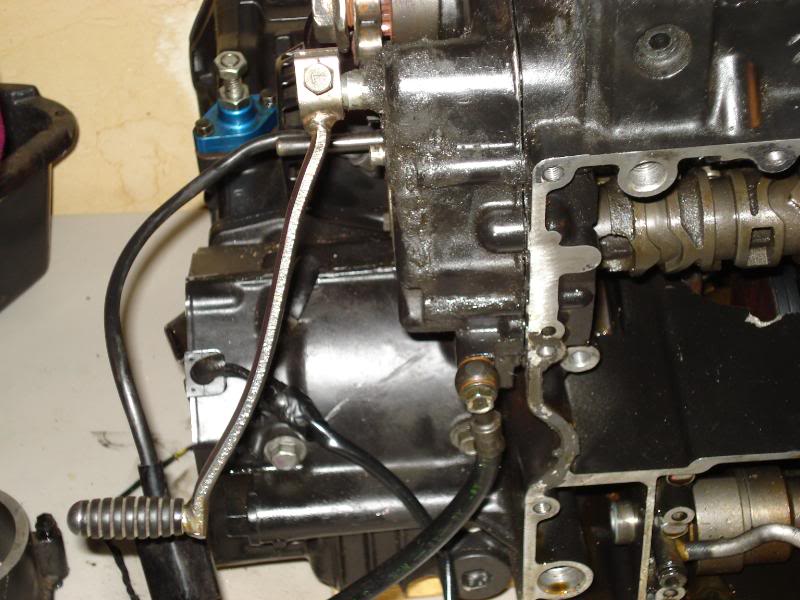
Right now the motor is back in the bike and will get pulled shortly for a temporary home on my work bench. But first, one thing I learned about building any motor...wash the whole damn thing before you take it apart. It is a major PITA to have to clean the dirt and grime that just magically appeared on your perfect gasket surface. The grinding of a particle underneath a bolt when your trying to torque it down is like nails on the chaulk board.
I have some tips about cleaning gasket surfaces I have learned from spending about 40 hours in the last 6 months just cleaning gasket surfaces.
Also I would like to ask if there is anything anyone that is keeping up with this post would like to see. Surely there is a collective voice out there that has gone through a bike or engine rebuild and wished "this fact" or "that fact" could have been included. Just throwing it out there.
Well, cheers fella's.
Mike
Thanks again.
I guess an update is in order. Well, in the last 5 months, got a gf lost a gf and in that time motorcycles were a little less of a priority...You all know how it goes.
As for the GPz, I have determined that a complete rebuild is in order for the motor. I have rebuilt a two stroke Honda and a KZ750 I finishing up now, so I am not as shy about rebuilding motors from the bottom up anymore. But cleaning gasket surfaces has now become a not so enjoyable past time. By rebuild, I mean all new gaskets, cleaning up the head ports, making sure everything is in order. I just want to be able to ride it and enjoy it. It is next in line after the KZ750.
I have secured the bottom end gasket set, but I ran into the $90 head gasket and was a little hesitant I will be bucking up here shortly for it. I have learned alot from rebuilding the KZ750 (which is why I did it first) and i will be able to more efficiently rebuild the 900.
Right now the motor is back in the bike and will get pulled shortly for a temporary home on my work bench. But first, one thing I learned about building any motor...wash the whole damn thing before you take it apart. It is a major PITA to have to clean the dirt and grime that just magically appeared on your perfect gasket surface. The grinding of a particle underneath a bolt when your trying to torque it down is like nails on the chaulk board.
I have some tips about cleaning gasket surfaces I have learned from spending about 40 hours in the last 6 months just cleaning gasket surfaces.
Also I would like to ask if there is anything anyone that is keeping up with this post would like to see. Surely there is a collective voice out there that has gone through a bike or engine rebuild and wished "this fact" or "that fact" could have been included. Just throwing it out there.
Well, cheers fella's.
Mike
#39
09-25-2008, 02:38 AM
A Teaser for you fella's...
I finally got the bottom end put back together and in the bike last weekend. I recieved the shifter shaft replacement seal (which as too small in dia, a how to too follow). I found a parts bike for 100 bones less the motor. Most of the plastic was good so it had lots of parts that would easily cost 500 on ebay. I am stripping what I can and trying to get the money out of the parts bike. I have to put the coolant and oil system back together.
enjoy!
#40
09-25-2008, 06:08 AM
month and half for engine rebuild. Not a bread and butter winner, but it seems you are there. Glad you have it back together.