
Stock Heat Shield on Muzzy Header


Junior Member
Joined: Jun 2006
Posts: 29
Are you still going to post close up pics. I am really interested in doing mod. Did you just buy standard like one and a half or two inch clamps from Home Depot or something. Thanks


Thread Starter
|
Senior Member
Joined: Aug 2006
Posts: 791
From: Winston-Salem, NC, USA
krntl13 and others, I had every intention of posting the pics tonight, but I left the Compact Flash card for my digital camera at work. I will take my camera to work tomorrow and take the pics in the morning. I will have them posted by midday.
As far as the clamps go, yeah, they are just regular old stainless steel hose clamps. I think I used a 1.5" clamp on the front point and 2" clamps on the middle and back points. The heat shield happens to span the area on the header pipe where the OD changes. The screws on each end were M6x15 flat cap machine screws. The middle one was an M6x25. The nuts and lock washers were just regular old M6 machine screw nuts with locking washers. All nuts and screws are stainless steel.
I will verify all of these dimensions and make any changes tomorrow when I post the pics.
Sorry for the delay in the pics.
Chris
Guest
Posts: n/a
ORIGINAL: cwgoff
I am almost afraid to bring up anything that has to do with my Muzzy exhaust because I don't want to start another shouting match, but here goes anyway.
I rigged up a permanent mount for my OEM heat shield to go on my Muzzy header. I always like the looks of the stock shield, and I definitely found out real quick that I needed something on the header to protect my pants. I had two pair of my best dress pants get singed on the cuff on the header.
I basically stole the idea from a few posts by koncoiler in this thread. For my mount, I positioned hose clamps underneath the bolt holes from the stock shield. Once I had the clamp positions marked, I removed them and drilled out a hole in each one. I screwed a flat head machine screw from the inside out and secured on the OD of the hose clamp with a lock washer and nut. I then positioned another nut on the screw as a standoff, on which the heat shield rests. On the outside of the shield, I place a lock washer and nut. All hardware stainless of course.
If anyone wants to duplicate this simple little mod, keep in mind that the curvature of the Muzzy exhaust is not exactly the same as the OEM unit (uh-oh - here we go). The Muzzy header is actually a little straighter than the OEM header at the point where the heat shield needs to be located. For this reason, the clearance of the heat shield relative to the header pipe is not uniform from front to back. Actually, the way I positioned it on my bike, the clearance is the same on both ends with about 1/4 - 1/2" extra clearance in the middle. This actually works out well because it gives you even more clearance in the exact spot where pants legs, etc. might possible contact the pipe.
Anyway, I like the way it looks and I haven't singed any pants legs since installing it. Done deal.
Here's a pic.

Lastly (I can't believe I am going to say this), I kind of like the contrast between the silver of the stainless heat shield and the bronze of the browning Muzzy header. I think the overall effect really works.
I am almost afraid to bring up anything that has to do with my Muzzy exhaust because I don't want to start another shouting match, but here goes anyway.
I rigged up a permanent mount for my OEM heat shield to go on my Muzzy header. I always like the looks of the stock shield, and I definitely found out real quick that I needed something on the header to protect my pants. I had two pair of my best dress pants get singed on the cuff on the header.
I basically stole the idea from a few posts by koncoiler in this thread. For my mount, I positioned hose clamps underneath the bolt holes from the stock shield. Once I had the clamp positions marked, I removed them and drilled out a hole in each one. I screwed a flat head machine screw from the inside out and secured on the OD of the hose clamp with a lock washer and nut. I then positioned another nut on the screw as a standoff, on which the heat shield rests. On the outside of the shield, I place a lock washer and nut. All hardware stainless of course.
If anyone wants to duplicate this simple little mod, keep in mind that the curvature of the Muzzy exhaust is not exactly the same as the OEM unit (uh-oh - here we go). The Muzzy header is actually a little straighter than the OEM header at the point where the heat shield needs to be located. For this reason, the clearance of the heat shield relative to the header pipe is not uniform from front to back. Actually, the way I positioned it on my bike, the clearance is the same on both ends with about 1/4 - 1/2" extra clearance in the middle. This actually works out well because it gives you even more clearance in the exact spot where pants legs, etc. might possible contact the pipe.
Anyway, I like the way it looks and I haven't singed any pants legs since installing it. Done deal.
Here's a pic.
Lastly (I can't believe I am going to say this), I kind of like the contrast between the silver of the stainless heat shield and the bronze of the browning Muzzy header. I think the overall effect really works.
Your Humble Moderator/Admin
Joined: Nov 2005
Posts: 21,060
From: Washington
1st Gear Member
Or you could just buy one of these. It only took 3 minutes to put on and it matches the muzzy tip.......assuming you have the muzzy
Guest
Posts: n/a
ORIGINAL: MaverickAus
I like the look of the stock heat shield ... just my 2c
I like the look of the stock heat shield ... just my 2c
just my .02 as well.
Thread Starter
|
Senior Member
Joined: Aug 2006
Posts: 791
From: Winston-Salem, NC, USA
Alright folks, here are the pics of my simple mod. As I said in a previous post, it is so simple I feel a little silly even calling it a mod, but it seems to have generated quite a bit of interest, so hopefully these pics will help out some.
I need to correct some of the hardware dimensions that I put in a previous post. I was confusing the screws, etc. that I used for this installation with those that I used to mount my Pelican case. Anyway, for this installation, the hoseclamps were regular stainless steel. As stated previously, I think I used one 1.5" and two 2". Don't hold me to that though. You might want to eyeball that before buying your clamps. The screws, nuts and washer were stainless steel M6 machine hardware.
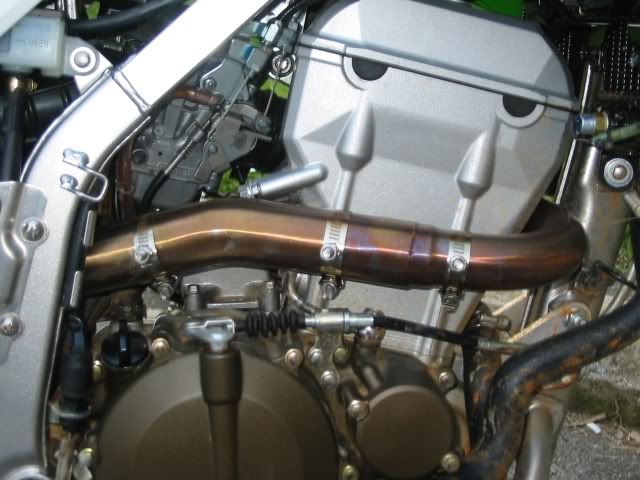
Side view - Note the front clamps is at a place on the header where the diameter is slightly smaller, thus the smaller diameter clamp. I just held the shield up to the pipe and marked the locations with a Sharpie (it just wipes off after). I left the clamps a little loose until I put the shield on the posts. Once it was all settled, I tightened the clamps down.
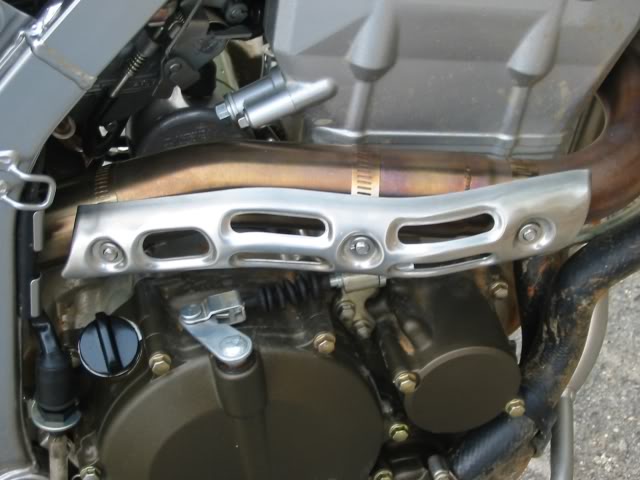
Top view - Note the middle screw is longer than the front and back screws. I think I used an M6x15 on the screws on each end and an M6x25 on the middle screw. Also note that I did not use a separate standoff nut on the end points. The heat shield just rests on the same nut that is holding the lock washer onto the clamp. For the middle post, I just eyeballed the point for the standoff nut that would allow the heatshield to fully engage on the ends.
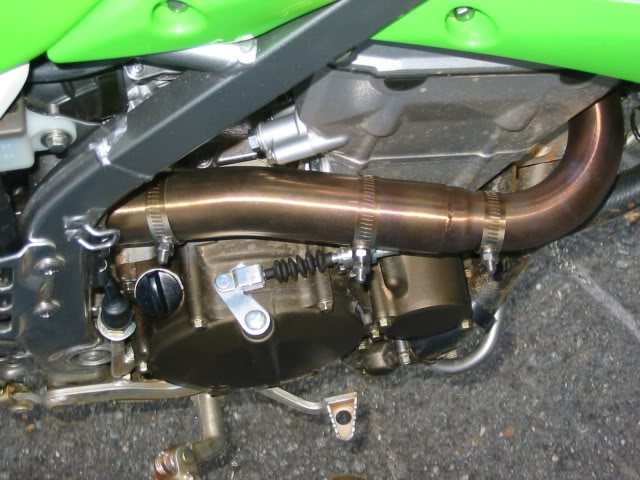
Side view w/ shield in place - The shield is not fully seated in this pic, but you get the idea. As stated above, at this point in the installation, I would leave the clamps a little loose so that you can move them around for final fitment. For this pic, I did not do that, so I was having a little problem getting the shield fully seated. I will loosed the clamps at home later and reposition slightly.
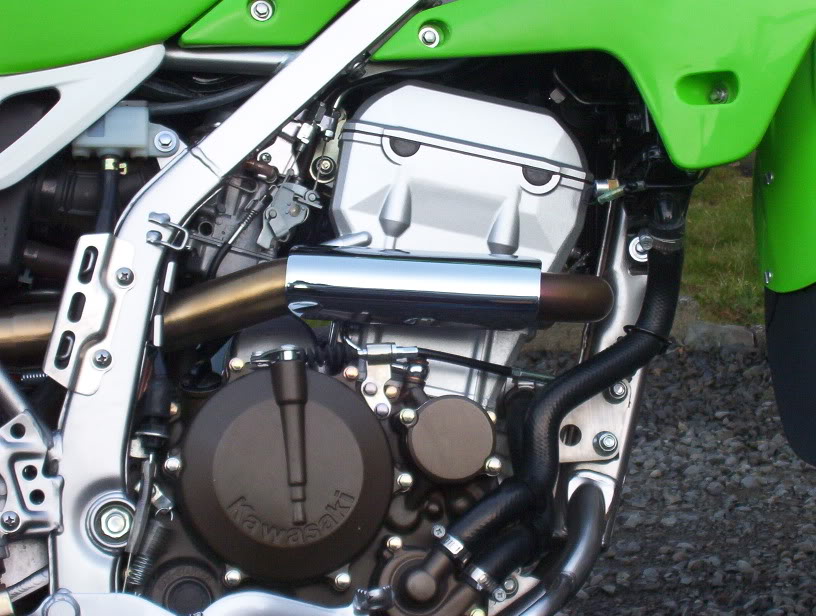
Final installation - Same pic as at beginning of thread showing final mod.
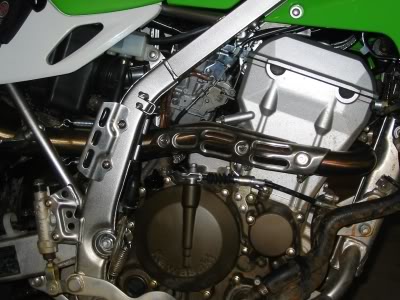
Like I said, it is very plain and simple. It works out nicely that the stainless clamps bronze just like the header pipe itself so they blend in even more.
Hope these pics help.
Chris
I need to correct some of the hardware dimensions that I put in a previous post. I was confusing the screws, etc. that I used for this installation with those that I used to mount my Pelican case. Anyway, for this installation, the hoseclamps were regular stainless steel. As stated previously, I think I used one 1.5" and two 2". Don't hold me to that though. You might want to eyeball that before buying your clamps. The screws, nuts and washer were stainless steel M6 machine hardware.
Side view - Note the front clamps is at a place on the header where the diameter is slightly smaller, thus the smaller diameter clamp. I just held the shield up to the pipe and marked the locations with a Sharpie (it just wipes off after). I left the clamps a little loose until I put the shield on the posts. Once it was all settled, I tightened the clamps down.
Top view - Note the middle screw is longer than the front and back screws. I think I used an M6x15 on the screws on each end and an M6x25 on the middle screw. Also note that I did not use a separate standoff nut on the end points. The heat shield just rests on the same nut that is holding the lock washer onto the clamp. For the middle post, I just eyeballed the point for the standoff nut that would allow the heatshield to fully engage on the ends.
Side view w/ shield in place - The shield is not fully seated in this pic, but you get the idea. As stated above, at this point in the installation, I would leave the clamps a little loose so that you can move them around for final fitment. For this pic, I did not do that, so I was having a little problem getting the shield fully seated. I will loosed the clamps at home later and reposition slightly.
Final installation - Same pic as at beginning of thread showing final mod.
Like I said, it is very plain and simple. It works out nicely that the stainless clamps bronze just like the header pipe itself so they blend in even more.
Hope these pics help.
Chris

