When you click on links to various merchants on this site and make a purchase, this can result in this site earning a commission. Affiliate programs and affiliations include, but are not limited to, the eBay Partner Network.
Posting the instruction will make it permanent in the forum, should my google drive go down.
KLX 250/300 Manual Cam Chain Tensioner Here it goes: Installing the new manual cam chain tensioner:
First rotate the engine to TDC compression by either putting the bike in gear, let out the clutch, and push the bike forward until it hits compression, which will be quite obvious. Or if you pull the plug on the left side engine case and rotate the crank counterclockwise with a socket until it hits compression. It is not necessary to be exactly on TDC, close is good. This gets the cams off the valves so they will not cause the cam drive to slip due to spring pressure against the cam lobes. .
Remove the “automatic” tensioner body from the motor by removing the two small bolts.
Remove the large plastic screw plug in the left side alternator cover on singles. See the “magic tool” in the photos. Remove the left side cover for multi-cylinder engines.
Back the adjustment bolt out on the new tensioner and remove the plastic sleeves from the mount bolts using an allen wrench and pliers.
Put some Yamabond (Hondabond, Kawabond – whatever bond) sealant or a similar goop on the tensioner gasket. I don’t know for sure, but even grease may work fine.
Install the tensioner in place threading in the supplied countersunk bolts. There is a saw cut notch to be on the bottom side of the tensioner body, make sure this edge is down..
Turn the adjuster bolt in snug by finger tips while cold or extremely gently with 6mm ball end of allen wrench, but do not overtighten if using an allen wrench. Keep in mind you are just removing slack and not applying tension to the cam chain.
Using the appropriate socket and ratchet on the bolt in the end of the crank shaft,
From the left side, rotate the crank shaft slowly counterclockwise, (from the right side rotate the crank shaft slowly clockwise) which will pull the cam chain taut on the drive side making the tensioner side slack, while turning the tensioner adjustment screw by hand. DO NOT spin the motor over with the starter, you risk jumping cam timing or possible valve damage due to excess chain slack. Do not force the crank if it should hit something solid, you do NOT want to damage a valve. Do not turn the engine over with the starter, that could also result in valve damage.
Turn the motor over for a few revolutions with the ratchet while tuning the adjuster bolt by hand, the tensioner bolt will turn in easily when taking up slack in the chain, but will resist turning when either the chain is under tension (turning the crank the wrong way) or when the slack has been taken up. Again do not use much leverage on the L bend of the allen wrench.
You should be able to tell when the slack is gone, the bolt will no longer turn easily.
Back off about � - ⅔ turn (two flats of the acorn nut).
Using one wrench tighten the tensioner locking nut down tight holding the allen nut with the allen wrench to keep the adjuster bolt from turning..
Rotate the crank slowly over again to make sure valves are not out of time and hitting the piston.
If you want to attempt fine tuning of the adjustment start the engine and warm it up to operating temperature and: with the engine running,
Loosen the locking nut and the tensioner bolt enough to hear and/or feel the cam chain tapping on the adjuster bolt. I have picked up a mechanic’s stethoscope to listen for noises, about $10 on ebay.
Gently finger-tighten the tensioner bolt until there is no detectable rattle/vibration.
Back out the tensioner bolt slightly until there is detectable light rattle/vibration (listen/feel very carefully, this is extra-fine tuning to make sure you don't over tighten)
Tighten the tensioner bolt back in slightly (about 1/8 turn or less) until rattle is gone.
Tighten the locking nut, holding the tensioner allen nut with the 6mm allen wrench to keep the bolt from turning
This works without gimmicks and guesswork that can over tighten the chains or let them flail around in the cases. Re-adjust if you hear the light rattle of cam chain again. I’ve only done about 4 adjustments over the past 25,000 miles using the “sound” method on the KLX650. I’ve not done the finger-tighten method on the KLX because it is just as easy to go by sound, I have on an Eliminator 900. The key point is what the tensioner does – it simply takes up excess slack so the chains don’t slap around and wear prematurely. There is no preloading necessary. I’ve only done the initial set up without the fine tune on my Zephyr 550 and it did fine. NOTE: there is an illustration of making a tool to do adjustments, another I learned is to use a �” flex drive. On the KLX and similar singles or similar multis with cam drive on the side.
Install tensioner as shown (old nut, not allen type now used).
Rotate the crank shaft counterclockwise with a socket and ratchet or breaker bar. This shows Thad’s adjustment method to get good feel. Warm up the bike and readjust per instructions.
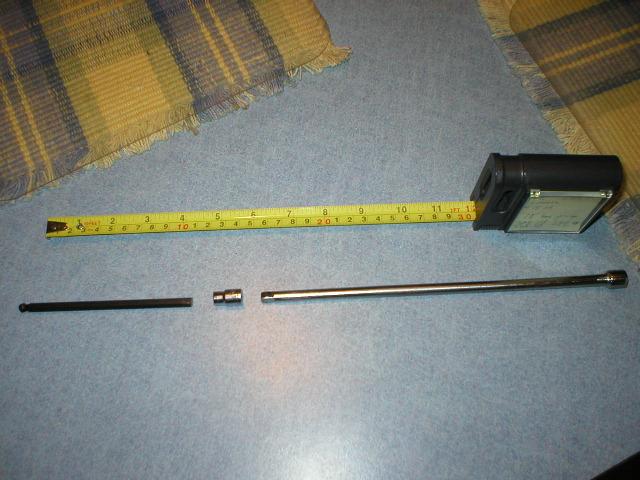
Then snug up the lock nut. This shows the special set up Thad used. The allen wrench may clear depending on head pipe.size. Here is the special set up Thad had set up to make the hot engine adjustment. The aftermarket exhaust makes it quite hot to do. Note the cut off 6mm ball end and � drive extension and 6mm socket.
Here’s a handy “tool” to remove the alternator plug… Innovative, huh.
While adjusting the tenisioner bolt in. by hand. Turn the crank several revolutions while doing this to get most all the play out. :
One more thing that should have some permanence. The condensed MCM instructions.
Marcelino Cam Timing Mod. For KLX250
Condensed Version
Eliminating all the background to get to the basics. The explanation of the Marcelino Cam Timing Modification is interesting and informative as to how he arrived at the modification. It does clutter up the actual How-To for the modification. After fighting with it reading several times, when I actually did the work it became crystal clear and very simple… well the idea was simple, getting the proper tooth position on the cam sprockets proved to be a bit confounding at times. I would move it the wrong way or one too many teeth, but still once I realized how it would figuratively look it all became quite elementary. Here it is: After disassembling everything down to get to the cams I recommend you first check clearance to make sure your valve clearance is within spec and I recommend you shim to the middle. As a friend/mechanic once commented, “A noisy valve is a happy valve.” The implication being if your valves are too tight, even by a bit, you risk burning the valve edges, but if the valves are even a few thou over the max all you get is lower performance and a clattery valves. Now to do the mod:
Unscrew the caps on the stator side of the engine, clamping a large 1” or so washer in a pair of Vise-Grips will work perfect since those slots are actually curved as is the Kaw special tool they have to remove them., like a giant woodruff key.
Break the cam sprocket bolts loose now, to make it easy to remove them later.
Crank the engine over to the T mark (TDC) on compression, the cams will be off the valves pointing out and up a bit. Perfect time to check valve clearance.
If you have a manual tensioner loosen the lock nut and back the tensioner out very loose. If you have the OEM tensioner look in the manual how to remove it and prep for resetting it at reinstallation.
Unbolt the cam cap. If you want to get **** retentive about it you could look at the tightening sequence and reverse it. Pop the cap off carefully, tapping it with a screwdriver handle or small plastic mallet to loosen it. You want to treat this part like gold, because if you hose it up you will part with some gold to get a whole new head since the cap and head are machined to match for the cam bearing surfaces.
Pull the cams out.
Remove the bolts from the sprocket on the intake cam, rotate the sprocket counterclockwise the small amount it takes to get the bolts into the EX holes and snug them up.
Remove the bolts from the sprocket on the exhaust cam, rotate the sprocket clockwise the small amount it takes to get the bolts into the IN holes and snug them up.
At this point I bring up two ways to deal with the KACR (automatic compression release), repositioning it and another mod that is far simpler than pressing the KACR mechanism out and repositioning it, disabling it. Neither the CRF250 nor the WR250 use a compression release. I personally am of the opinion the KLX250 has it as a remnant from the KLX300 on which it is based. The 300 is kick start only.
Marcelino - “I HAVE TO REPOSITION THE ACR, it means I need a press and a custom made wooden clamp for the exhaust shaft, we don’t want to break or chip lobes now do we? A friendly word of advice: Don’t do this at home! Take the camshaft to a head shop and have them do the ACR. The camshaft is hollow and the ACR can be pressed out using a rod, it needs to be turned 6-7 mm (1/4 inch) at the edge counter-clock-wise as you look at the ACR.”
take off the spring, the compression release will not open the valve now.
I wired mine disengaged but so many naysayers, gnashing their teeth in biblical ways, have caused me to say screw it and remove the information, while still running it just fine thank you.
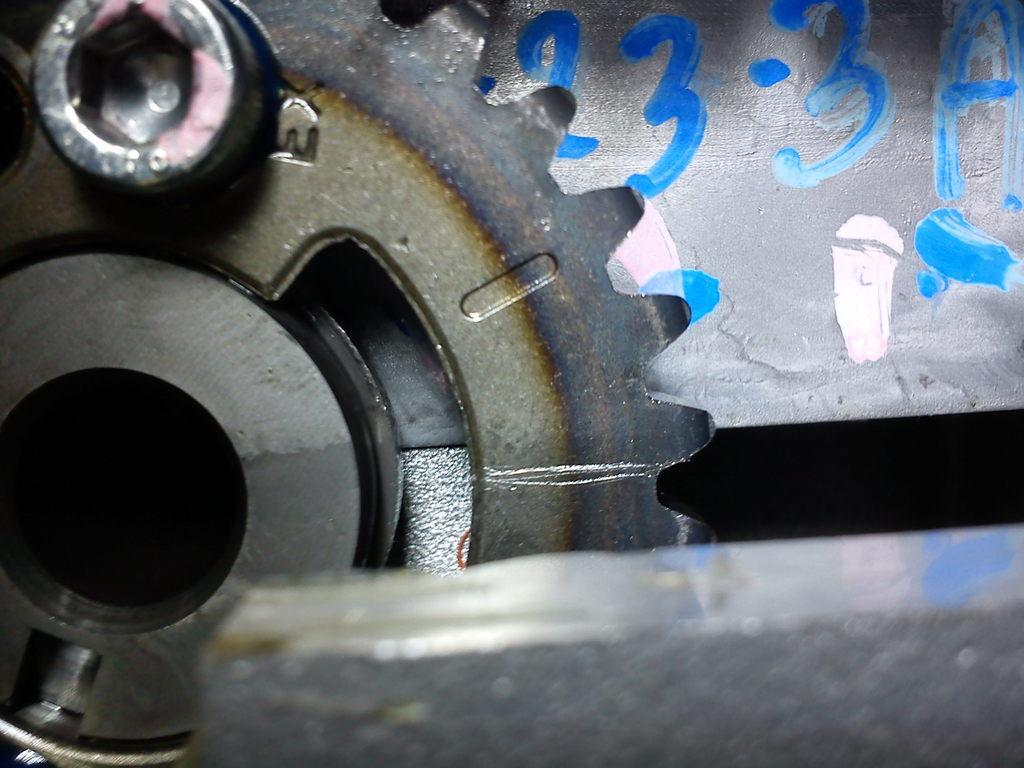
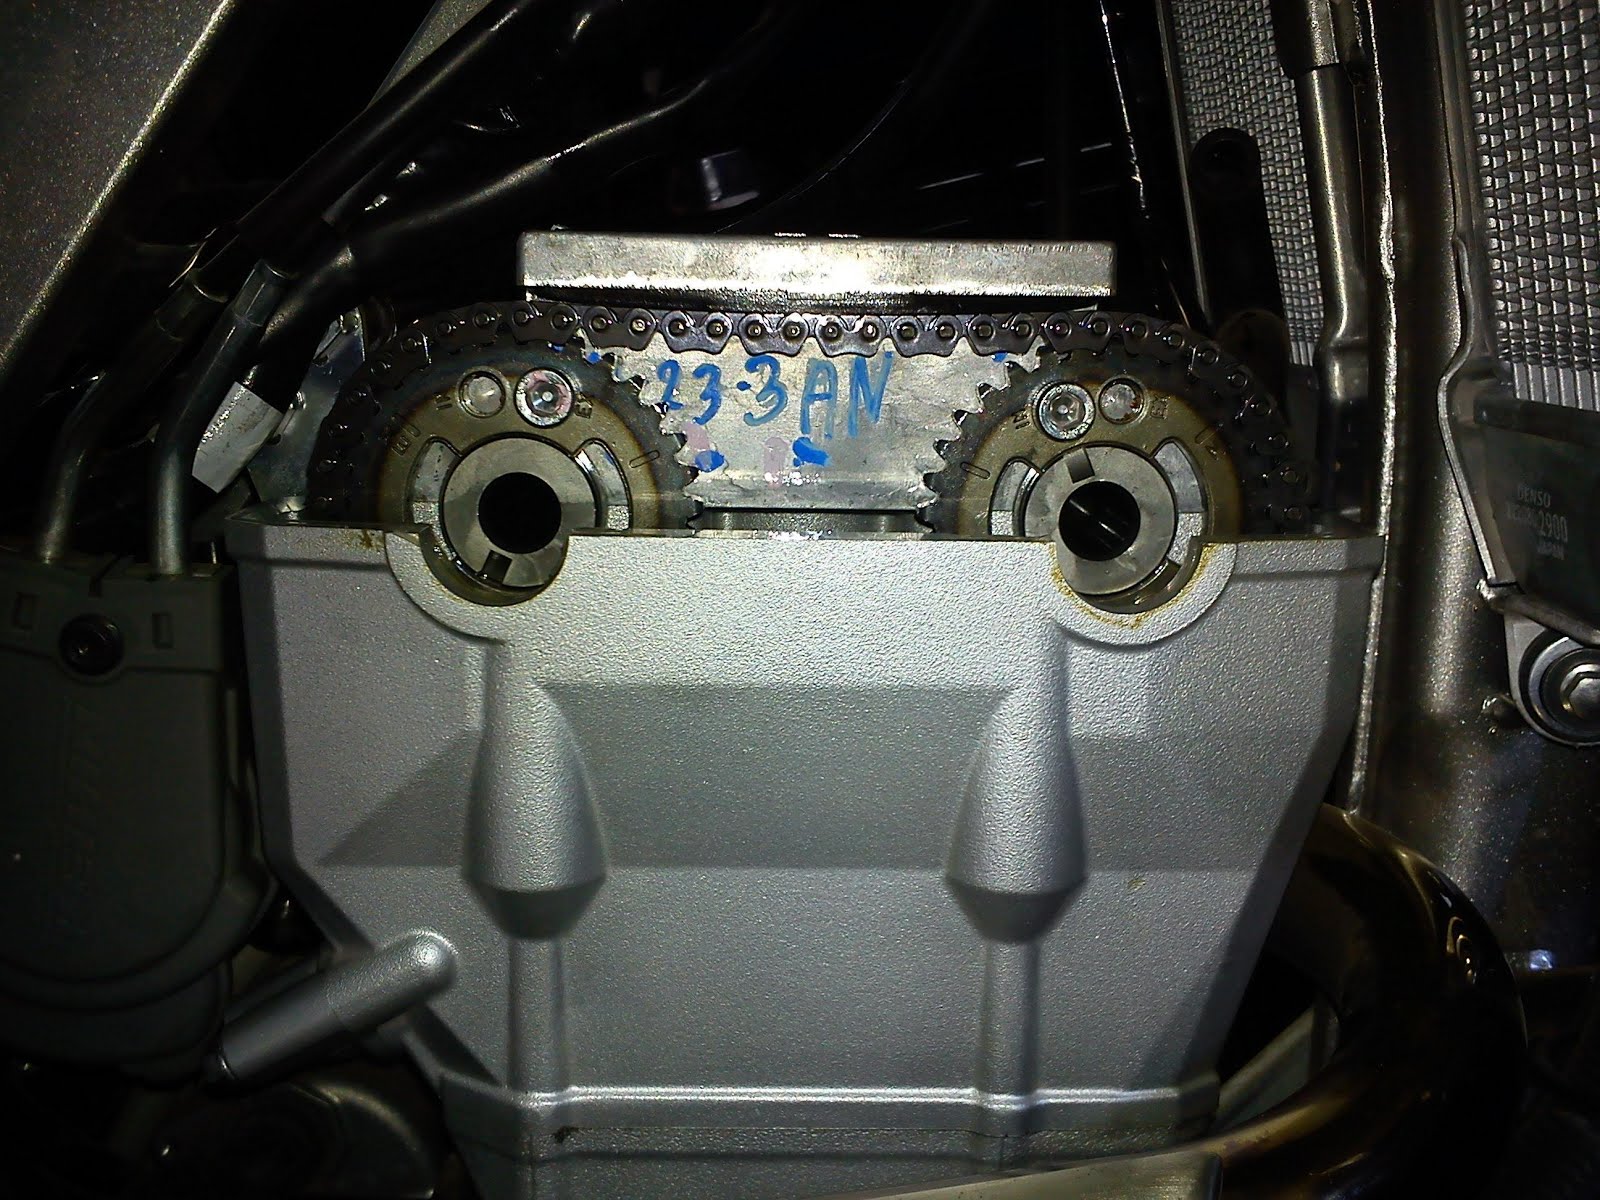
With the engine still set at TDC, hopefully you didn’t move it while goofing with the cams, place the cams back in the engine, put some oil on the journals just because. You need to set them so the alignment mark that is normally horizontal with the head surface, is now rotated to the point where you see the mark between the two sprockets at about 2- 2.5 teeth above the surface depending on how you look at it - pretty simple… except if you are like me you will keep screwing up and moving the cams one tooth too far or the wrong way, but seeing and knowing this setting it is very obvious when you are off one tooth either way. It now it is quite easy to set the cams properly. Images below:
Intake cam setting Exhaust cam setting All done!
Install the cam cap, the long bolts go in the two holes that have the alignment pins. Important note: Make sure the cam cap seats down against the head surface before tightening any bolts. LIGHTLY tap the cap with a screwdriver handle end or a plastic mallet, but DO NOT force it down. It should seat down without any gaps. Break the cap and you buy a new head - the cap is line bored to match the head, you cannot bolt one on from another head.
Snug up the bolts with your fingers or lightly with a ratchet, then start torquing the fittings in the sequence listed in the manual. I do them first at 50 in-lb (6 N-m) then 106 in-lb (12 N-m), two steps full sequence.
Adjust the play out of the cam chain if you have a manual tensioner, reset and reinstall the OEM per the manual if you use it.
Tighten your cam bolts up to 44 in-lb (4.9 N-m) and then 87 in-lb (9.8 N-m)
Dump a bit of oil on the cam assembly, again, just because.
Put the cam cover back on and tighten it up 69 in-lb (7.8 N-m)
Re-adjust the manual tensioner again, finger tight, then back off about 1/8-1/4 turn and lock it down tight.
All is now good, button her up! Don’t forget the stator cover cap screws.
At this point all should be good on the cam mod. As you see, once the sprockets are bolted on it is simply to see when the center marks on each cam are properly positioned above the head surface - kinda simple.
When it comes to performing the work for the MCM, so many people get too bound up in all the original information Marcelino posted and now the images are gone, so I condensed the actual mechanical aspect into a relatively easy instruction to follow. I list it in my signature. It does not tell you what the performance difference is or any other of the technical aspects, just how to do it. I kind of wish the administrators here would make the straight forward mechanical information a sticky since the original is so convoluted now. I don't want that information to get lost should something happen to my Google Drive or any other copies out there. You see what happened to the images when Marcelino let them disappear. No idea why, but it shows how it is possible for information to disappear on the internet... unless it's **** of course.
Here are my thoughts about the MCM after reading up on the information about cam lobe separation angle. Hot Rod published an article on wide LSA vs narrow LSA, which plays into intake-exhaust overlap in an engine. Click here to read the article. Seems the narrow LSA put out more power when "on the cam". It lost a small amount down low - the reason why a well tuned car with a performance cam has a lumpy idle, where the wider LSA would run smoother down low, but not put out maximum possible power. Because of that I think it's probably actually got a positive effect on any of the KLX displacements whether 250, 300, 330, or 351. But why do the riders of the bigger bores say it doesn't feel more powerful or even a bit less powerful. Then...
A few days back I read an article about jetting written by Kevin Cameron in Motorcyclist. He brought up that in a jetting session with his rider, Cliff Carr, they were struggling, then all the sudden after one change the lap times fell by four tenths of a second per lap. When Carr came in Cameron asked, "How did it feel?" Carr said, "If felt flat." Then Cameron shows him the times. Seems the bike felt flat because it was easier to ride faster. I kind of wonder if those butt dynos are missing the fact that the bike might just be running harder easier.
I don't know if anyone has done a dyno run on a 300, 330, or 351 with stock setting then MCM, I haven't seen any. So there is no actual proof either way - to my knowledge. But the article in Hot Rod on wide LSA vs narrow LSA and some other reading on the topic reinforced what should happen when the overlap increases, what happened with the KLX, more power through the mid into the top range regardless of displacement since it is about cam design. Whatever might be lost is lost so far down in the range that it is virtually unnoticeable since we don't chug around at idle to 2000 rpm or wherever. I think the KLX stock cam timing was originally to cut overlap to run cleaner since less intake charge could escape at the lower rpm..It sacrificed the power to meet the DOT/EPA standards.
What it comes down to is that the narrower LSA plays into the cam design and the best power delivery. Seems it works on a 500+ ci LS motor, a 1986 Honda CB700SC (Joe Minton did the same thing Hot Rod and Marcelino did on a Nighthawk S), so if it does work to the cam design why should it work on a 250cc, a 700cc, and a 500 ci engine, but suddenly not make sense or work on a 300, 330, or 351? Since the article didn't really distinguish between displacements, but rather only the cam design using three identical lift/duration cams with only difference being the LSA, it makes me wonder if the situation that Cameron encountered with Carr might be the same with the riders who said "no difference" or "felt weaker". Until someone does something to demonstrate that isn't correct I guess I'll say that's my story and I'm sticking to it. By the way both Hot Rod and Joe Minton did do dyno runs.
Makes one wonder, think, and research a bit when something catches your eye - I subscribe to Hot Rod so it caught my eye.
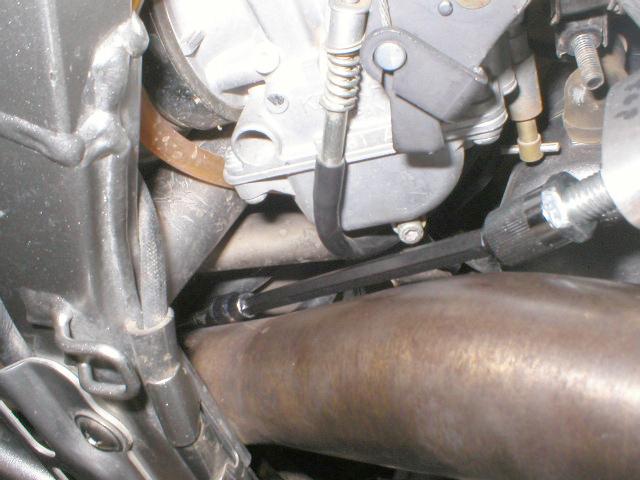
Put mine in the other day. That back bolt was a bitch but I managed to get it in without an extension or taking off my muzzy header. Really quieted down the cam chain. I did finger tight and backed it off two edges on the bolt as directed. Thank you!
TNC had the trick with the long extension set up. Illustrated in the instructions. Just do it using the 4mm allen to install the fasteners, then a 6mm to do the adjustment. Makes life easy. Those long extensions don't get used often, but when you need one they're well worth having.