Going Tubliss, one wheel at a time
#1
 09-22-2013, 01:28 PM

Join Date: Mar 2012
Location: WMNF, NH, USA
Posts: 1,264
After chopping the crap out of many front knobbies, I decided to go tubeless. I only bought a front set up for now, I'm a broke SOB because I just bought new tires (1 front and 2 rear D606s) and studs(carbide ain't cheap ). I decided one up front would be most beneficial.
As I mentioned I've chopped the crap out of a few front tires now. I never balance them , except for putting weights opposite my rim lock. I know that's part of where the chopping comes from. After a spring switch from a rim locked, studded wheel to a Shinko 705, with no rim locks, for my slab trip to S. Carolina, I immediately noticed the smoooooth ride of my "trip" wheels. And I'm not talking tread, I mean the unbalanced movement seen in the forks(probably some of what contributed to needing new fork seals).
With 1200 miles to think on the way to S. Carolina....well, I got to thinking about TNC's posts about the Tubliss set up he runs. Didn't really understand how it worked, so I googled it and was immediately intrigued. The only thing was the price...but I figured it's sort of like putting solar on your house - big expense up front, but savings ever after, no more tubes to replace.
So it's a little premature to post this, as I don't have the tires or the Tubliss yet(it's Sunday, raining, and cold - no riding ). But I will post up some install pics and ride impressions, once the brown truck shows up...
What I'm really excited for is 8lbs of air pressure with no worries! Well and some real ***** to hit the dirt with some confidence.
). I decided one up front would be most beneficial. As I mentioned I've chopped the crap out of a few front tires now. I never balance them
, except for putting weights opposite my rim lock. I know that's part of where the chopping comes from. After a spring switch from a rim locked, studded wheel to a Shinko 705, with no rim locks, for my slab trip to S. Carolina, I immediately noticed the smoooooth ride of my "trip" wheels. And I'm not talking tread, I mean the unbalanced movement seen in the forks(probably some of what contributed to needing new fork seals).With 1200 miles to think on the way to S. Carolina....well, I got to thinking about TNC's posts about the Tubliss set up he runs. Didn't really understand how it worked, so I googled it and was immediately intrigued. The only thing was the price...but I figured it's sort of like putting solar on your house - big expense up front, but savings ever after, no more tubes to replace.
So it's a little premature to post this, as I don't have the tires or the Tubliss yet(it's Sunday, raining, and cold - no riding
). But I will post up some install pics and ride impressions, once the brown truck shows up...What I'm really excited for is 8lbs of air pressure with no worries! Well and some real ***** to hit the dirt with some confidence.
#2
09-22-2013, 06:14 PM
The Tubliss deal is funny in how most really like it, and the others who've tried it hate it. From hearing the negative comments, it sounds like improper installation efforts. Take your time and follow the directions carefully. It is super important to cover that spoke valley. Over 4 years of use and quite a few tires, I found that the tape delivered with the kit gets "mushed" down pretty good in short order by that high pressure inner liner. I've been using stranded packing tape over the stock tape that comes with the kit. Stranded packing tape is that clear stuff that is almost all white with the many nylon strands woven into the tape. The stuff is tough. Armor up that spoke valley, and you'll be guaranteed long service from that inner liner.
I also like to run sealant in mine. I've a couple of nails and other pointy stuff in my tires without any air loss. I went ahead and plugged the tire after removing the nail at camp or home to insure no further damage. Worked great.
I also like to run sealant in mine. I've a couple of nails and other pointy stuff in my tires without any air loss. I went ahead and plugged the tire after removing the nail at camp or home to insure no further damage. Worked great.
#3
09-22-2013, 11:49 PM
Join Date: Mar 2012
Location: WMNF, NH, USA
Posts: 1,264
TNC - I know the tape well. I've used gaff tape before, when my rim stripe broke, but this time I'll need the strapping tape to deal with the pressure.
I think I'll like it just fine. I mean a rim lock that locks the whole rim, and won't give me the rim lock shimmy, what's not to like? I've watched a few videos in preparation. I've learned the hard way about proper installation of tubes and tires. I have no intention of screwing this up...
The tire sealant is a good idea, thanks!
#4
09-23-2013, 12:43 AM
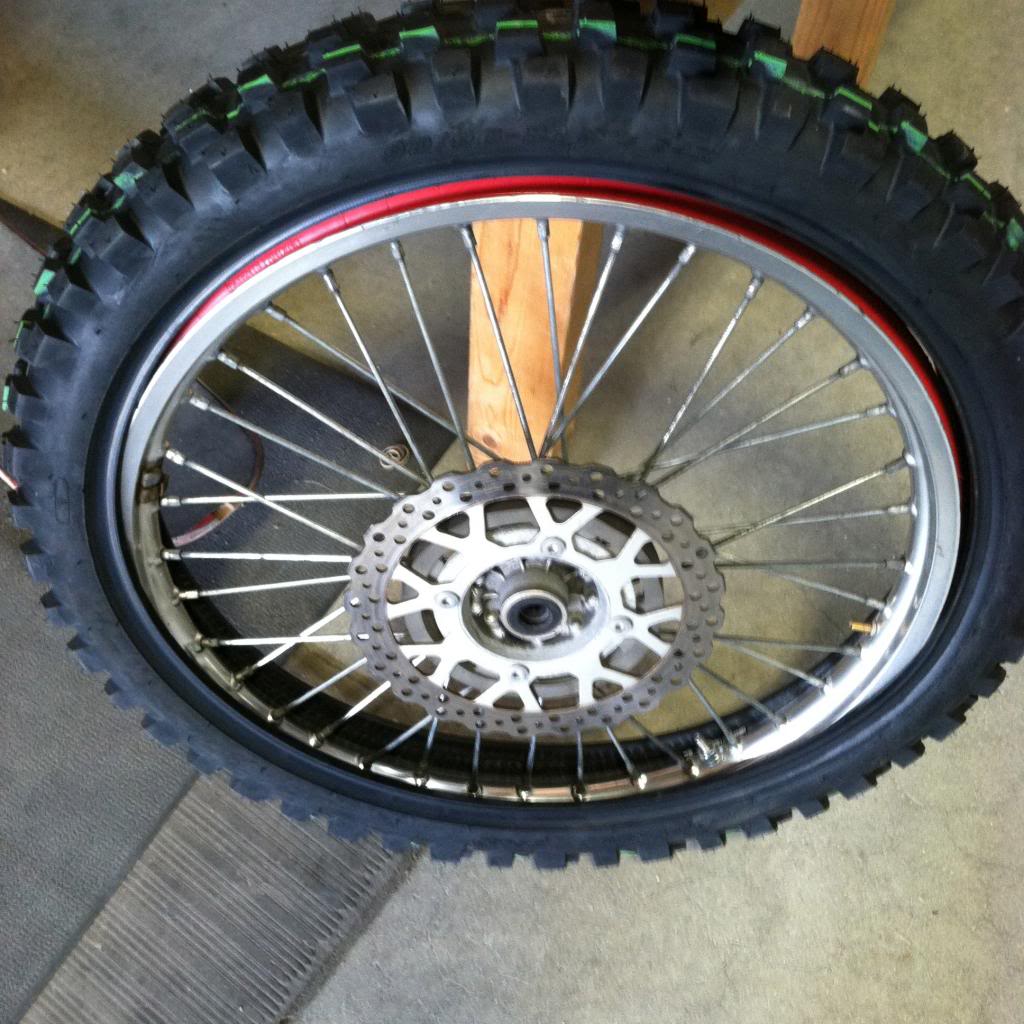
MP, you may have to still balance the front tire. There is a rim lock integrated into that red outer liner. It may be a little lighter than an OEM rim lock, but I still had to do a rudimentary homespun wheel balance on the front. That integrated rim lock I mention is there in case everything goes to pot...flat tire and flat inner liner...just like you'd need with a regular tube setup. You still have a rim lock for safety instead of the whole tire flopping loosely on the wheel.
#5
09-23-2013, 03:33 AM

The integrated rimlock was also the source of many fails in the system till they redesign it. Make sure you buy the newer style. Like TNC posted the system seems to be either loved or hated. More guys I know gave up on it, but a few really like it. Carry plugs.
#6
09-25-2013, 02:52 PM

MP, you may have to still balance the front tire. There is a rim lock integrated into that red outer liner. It may be a little lighter than an OEM rim lock, but I still had to do a rudimentary homespun wheel balance on the front. That integrated rim lock I mention is there in case everything goes to pot...flat tire and flat inner liner...just like you'd need with a regular tube setup. You still have a rim lock for safety instead of the whole tire flopping loosely on the wheel.
Like others have said, taking your time on the installation, especially cleaning the rim where the bead seats and using lotsa lube when installing the inner liner on the rim makes all the difference.
Love running single digit air pressures off road!

#7
10-05-2013, 01:43 AM
Join Date: Mar 2012
Location: WMNF, NH, USA
Posts: 1,264
Well that was too easy of an install. It was so nice not worrying about pinching a tube. I meant to take pictures but it all went together so fast, I didn't get any.
After doing the front, I had to wrestle the rear on. I almost ordered the rear Tubliss, mid-install of the rear tire.
Ran up and down the driveway to make sure I wouldn't have any problems...now I'm going to check out a new logging road in the dark. I think I'm really going to like it.
After doing the front, I had to wrestle the rear on. I almost ordered the rear Tubliss, mid-install of the rear tire.
Ran up and down the driveway to make sure I wouldn't have any problems...now I'm going to check out a new logging road in the dark. I think I'm really going to like it.
#8
10-06-2013, 05:55 AM
Join Date: Mar 2012
Location: WMNF, NH, USA
Posts: 1,264
So my Shinko 705's had really left me with the desire to go supermoto...a left over of my Ducati days...really getting on it and hitting turns WOT...
With the new knobbies, I really wanted to save some meat on the tires, by not railing the turns(at least on the road), and I figured 10psi on the road would slow me down. It did, but off road!!!!!!! I could hit anything and just keep on keepin' on.
Holy crap, I love the Tubliss!!!!!!!! I hit a square ledge rock, felt the rim hit and just kept rolling. No flat!!! Love it more than my new Dunlop 606's. And the 606's feel just like whatever tire I rode as a kid...almost no traction until it counted, then all the traction you needed.
The only pic of the install I grabbed...it shows the Tubliss set up on the rim, inside the tire.
What I need now is a compressor that'll pump me up to 100-110 psi.
Ended up here...
#9
10-06-2013, 07:20 PM
Get a moderately decent bicycle floor pump from a bicycle shop...not the Walmart kind of crap. Most of those will achieve a minimum of 150 to a max of 200 psi with no drama...and last forever. I use a Topeak Joe Blow pump that was about $30-$40. I can pump up car tires, high pressure bike tires, and of course the Tubliss inner liner. And I can take the pump with me on my trips and use it anywhere.