
2007 KLX250: Valve clearances/shim replacement.

Thread Starter
|
Senior Member
Joined: Oct 2008
Posts: 328
From: Newfoundland, Canada
1st Gear Member
Here's a little tutorial on valve clearance check and adjustment for a 2007 KLX250. This is not really a job for a beginner, but if you have faith in yourself, go for it. Not all bikes are like this and personally I think this has to be the worst system for valve adjustment. Invest in a good service manual - preferably the one from dealer. Don't rely on me because I may have missed something. My conscience is now clear. 
OK, first off, besides basic tools your gonna need a torque wrench (something that can do 8.5 ft-lbs) metric feeler gauges, and a good micrometer to do the shim replacement. If just doing clearance check, basic tools and feelers will do.
A note on feeler gauges: I bought myself a set that were metric only. I don't like using these sets with both metric and standard. They are usually standard sizes with metric conversions so you don't get exact metric numbers. But, that's just my preference.
First give the bike a good wash to remove all the dirt accumulated. You may notice that I never gave a good wash, but that's my choice. I did wipe down all critical areas and gave a good blast with air.
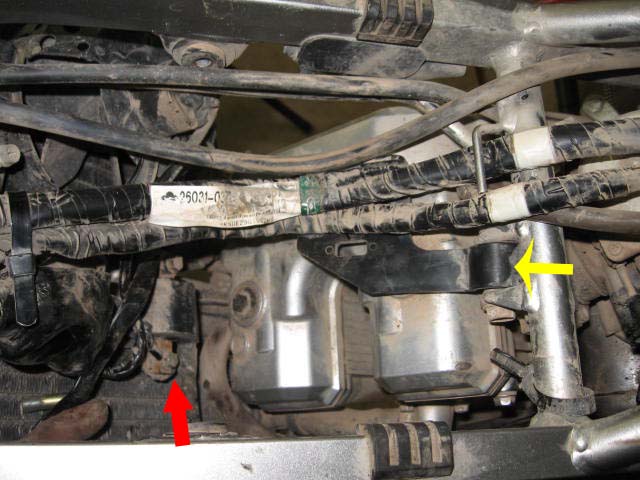
Next, remove seat, side guards, and fuel tank. In the next pic is what you'll see. I also removed wiring bracket (yellow arrow) and pulled the wires to one side. I also remove the ignition coil (red arrow) to have more room for cover removal.
Once thats taken care of things look a little better
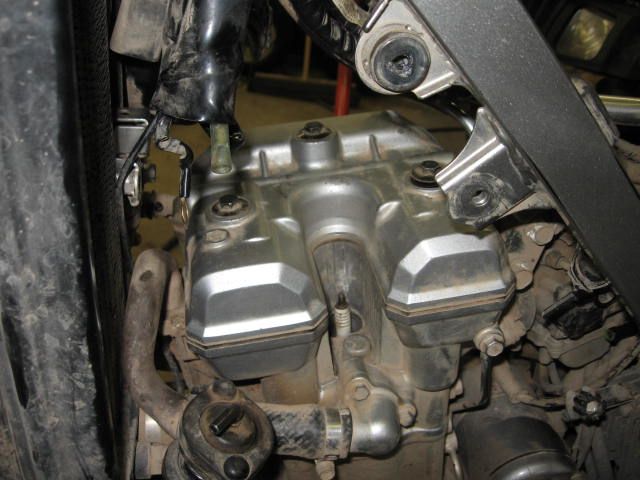
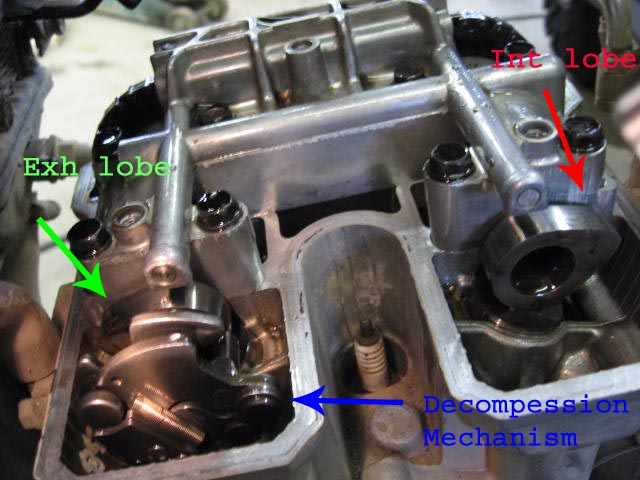
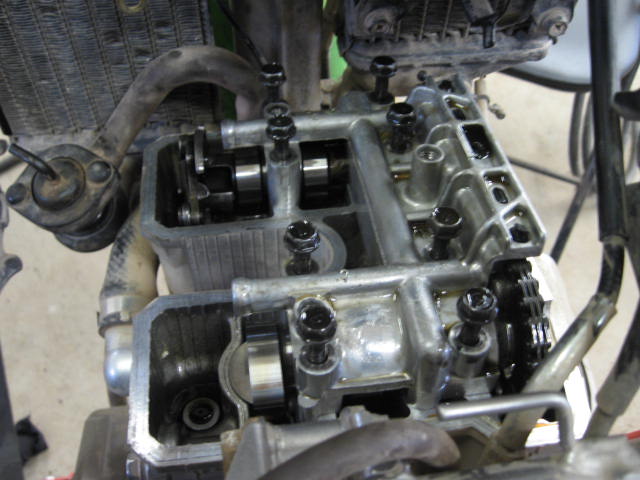
In the pic above you can also see the 3 bolts holding the cover down. Remove these and carefully remove the cover. Careful with the gasket. You will now see two camshafts. Naturally, front is exhaust and rear is intake.
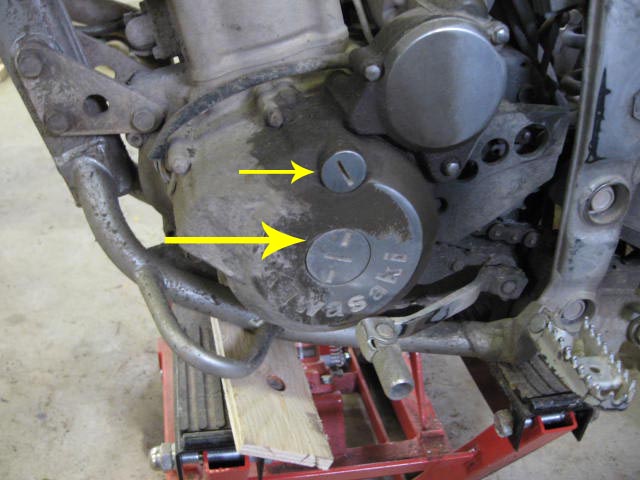
Next, remove both plugs on left side of engine case as indicated in the next pic. Top plug is where ya look for timing mark,bottom plug is where ya turn engine using 17 mm socket.
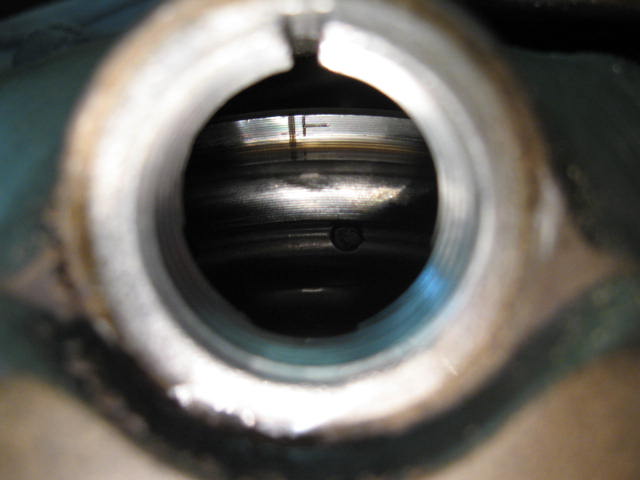
So, while turning the engine counter-clockwise look at the intake lobe of the intake cam. Watch it push down on the lifter then come back up. At this point look in the top plug of the case. Slowly turn CCW until you see a mark with the letter "T" stamped alongside of it. You'll actually see a mark with "F" first. The T is just after it. Looking thru the hole this is what you should see:
Looking at the cam lobe positions, the next pic shows what ya should see.
And if you look at the cam sprockets the timing marks should be level/inline with the top surface of the head like so:
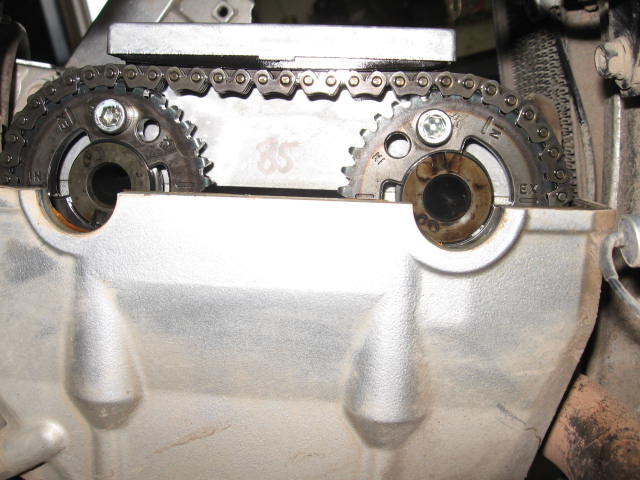
Also note the mark "IN" is aft and the mark "EX" is forward. There are more marks present but the ones stated are the important ones.
This what everything will have to look like when finished re-assembling.
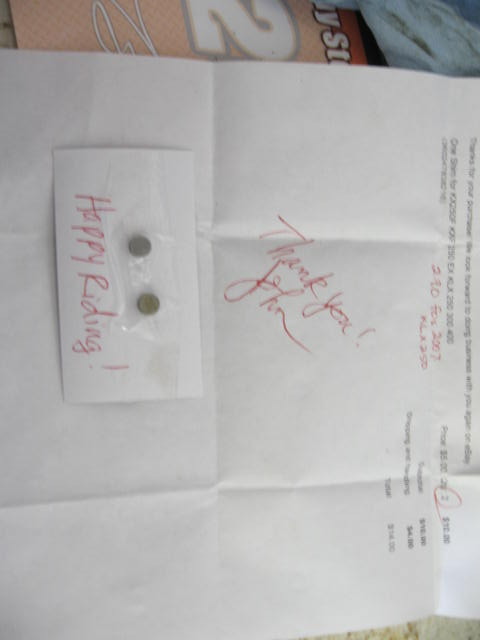
OK, now you can check the clearances. My intakes were good (0.15 mm), but exhaust was tight ( 0.14 mm)For my bike: the intake is 0,10mm - 0.19mm, exhaust is 0.15 mm - 0.24 mm. Anything outside this range will need to be adjusted accordingly. I knew mine were due for change. Last year I measured all my shims so I knew what to order. My originals are all 3.00 mm. So, I knew I needed 2.90 mm shims to bring me back in the upper range of the clearances. Got mine thru ebay for $5 each. Came by letter mail (the "Happy Riding" was a nice touch.
Shim replacement:
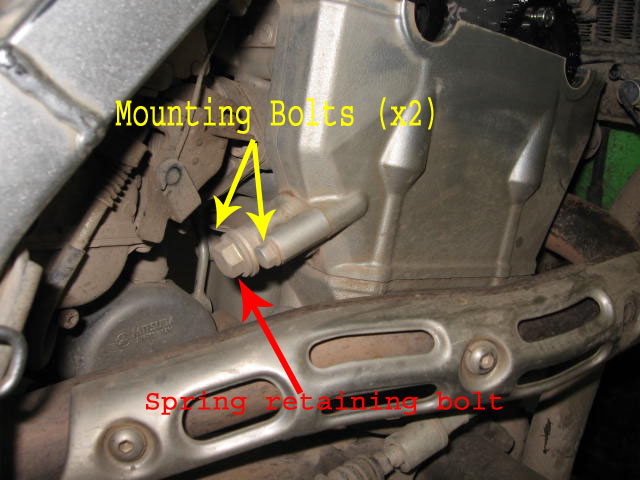
First step is to remove timing chain tension spring bolt and spring and then the 2 bolts for the mount. then pull the mount out. refer to next pic:
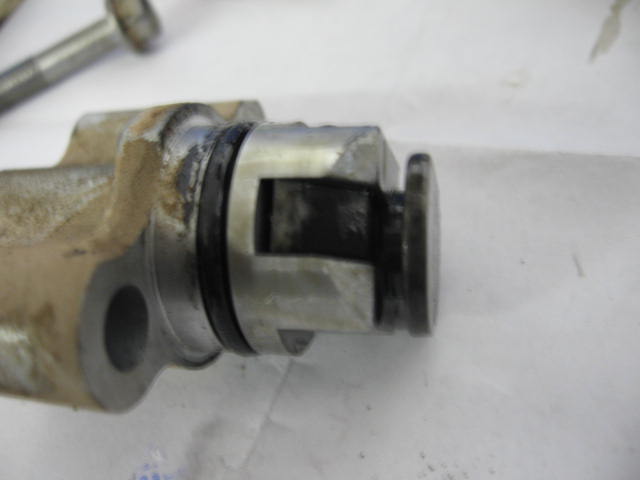
This is what the mount looks like when removed:
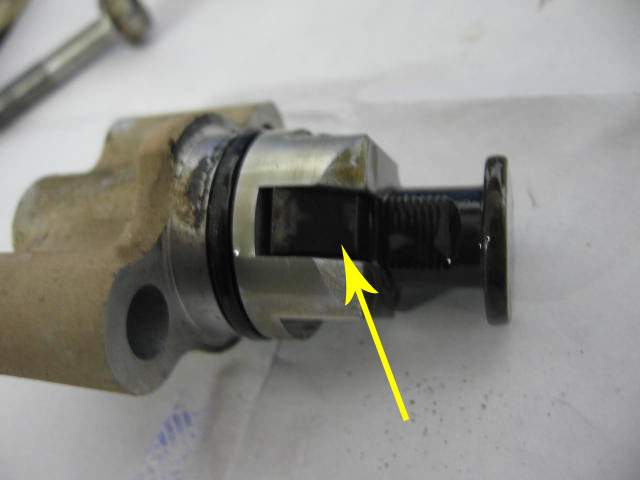
Important: tensioner must be reset. Lift up on the locking pawl (yellow arrow)) and push the tensioner rod fully in. Now it should now look like this:
Now comes the harder part: OK... so now we have to remove the camshaft cover. In the next pic you can see all 8 bolts loosened.
After removing bolts, cover can be removed. Next it would be a good idea to tie the timing chain off to some part of the bike to keep it from falling way down into the engine. Now you can remove the exhaust cam (if doing exh clearances). To remove cam its sorta of a tilt/tip/lift process. Thats about the only way I can explain it. With cam removed you can now take up one of the lifters. Only do one at a time to avoid mixing of parts. In the next pic you can see the valve spring where the shim sits once the lifter is removed. To the right you can see the other lifter still in place.

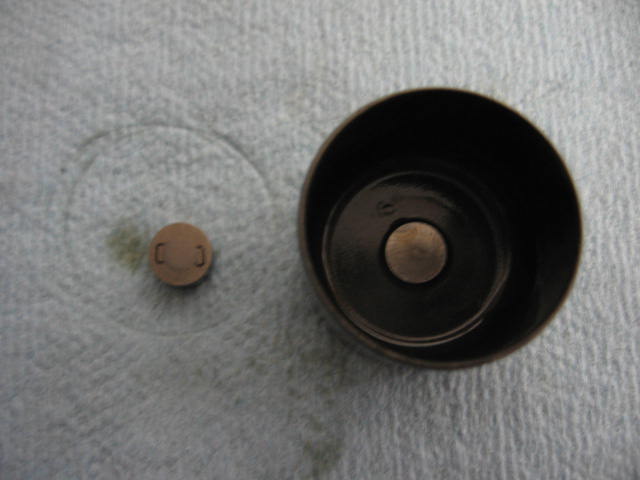
My shims stayed stuck to the underside of the lifter. Keep this in mind when removing lifter. Place hand under it as soon as possible to prevent dropping into the engine somewhere. Heres a pic of the bottom of the lifter and the shim alongside of it.
Measure this shim with the micrometers to figure out what shim is required to put back in. Place new shim on top of valve as indicated in a previous picture. Then place lifter back in place. Repeat for any other lifters/shims.
Once this is complete you can start reassembling. Getting the cams back in is a bit tricky. It will probably take a couple of tries. When all is right you should be at your original marks on the cam sprockets and flywheel as you set up earlier. If all looks well re-install cam cover. On the KLX the torqueing sequence is stamped in the cover. Also on the KLX bolts #1 and #6 are the two that are longer. The cover goes torqued to 8.5 ft-lbs (or 102 inch-lbs if you prefer). I like like to torque in steps rather than full torque right from the beginning.
Next you can install the cam tensioner mount and then the spring.
Now, very slowly using the flywheel turn engine by hand several revolutions. If at any time a resistance (besides compression) is felt "STOP" you may have screwed something up. Hopefully this doesn't happen. All is good... perfect. Re-assemble the rest of the bike. This would also be an ideal time to shuff in a new spark plug while it's easy to get at as well.
Happy Wrenchin'.
Relic.
OK, first off, besides basic tools your gonna need a torque wrench (something that can do 8.5 ft-lbs) metric feeler gauges, and a good micrometer to do the shim replacement. If just doing clearance check, basic tools and feelers will do.
A note on feeler gauges: I bought myself a set that were metric only. I don't like using these sets with both metric and standard. They are usually standard sizes with metric conversions so you don't get exact metric numbers. But, that's just my preference.
First give the bike a good wash to remove all the dirt accumulated. You may notice that I never gave a good wash, but that's my choice. I did wipe down all critical areas and gave a good blast with air.
Next, remove seat, side guards, and fuel tank. In the next pic is what you'll see. I also removed wiring bracket (yellow arrow) and pulled the wires to one side. I also remove the ignition coil (red arrow) to have more room for cover removal.

Once thats taken care of things look a little better

In the pic above you can also see the 3 bolts holding the cover down. Remove these and carefully remove the cover. Careful with the gasket. You will now see two camshafts. Naturally, front is exhaust and rear is intake.
Next, remove both plugs on left side of engine case as indicated in the next pic. Top plug is where ya look for timing mark,bottom plug is where ya turn engine using 17 mm socket.

So, while turning the engine counter-clockwise look at the intake lobe of the intake cam. Watch it push down on the lifter then come back up. At this point look in the top plug of the case. Slowly turn CCW until you see a mark with the letter "T" stamped alongside of it. You'll actually see a mark with "F" first. The T is just after it. Looking thru the hole this is what you should see:

Looking at the cam lobe positions, the next pic shows what ya should see.

And if you look at the cam sprockets the timing marks should be level/inline with the top surface of the head like so:

Also note the mark "IN" is aft and the mark "EX" is forward. There are more marks present but the ones stated are the important ones.
This what everything will have to look like when finished re-assembling.
OK, now you can check the clearances. My intakes were good (0.15 mm), but exhaust was tight ( 0.14 mm)For my bike: the intake is 0,10mm - 0.19mm, exhaust is 0.15 mm - 0.24 mm. Anything outside this range will need to be adjusted accordingly. I knew mine were due for change. Last year I measured all my shims so I knew what to order. My originals are all 3.00 mm. So, I knew I needed 2.90 mm shims to bring me back in the upper range of the clearances. Got mine thru ebay for $5 each. Came by letter mail (the "Happy Riding" was a nice touch.

Shim replacement:
First step is to remove timing chain tension spring bolt and spring and then the 2 bolts for the mount. then pull the mount out. refer to next pic:

This is what the mount looks like when removed:

Important: tensioner must be reset. Lift up on the locking pawl (yellow arrow)) and push the tensioner rod fully in. Now it should now look like this:

Now comes the harder part: OK... so now we have to remove the camshaft cover. In the next pic you can see all 8 bolts loosened.

After removing bolts, cover can be removed. Next it would be a good idea to tie the timing chain off to some part of the bike to keep it from falling way down into the engine. Now you can remove the exhaust cam (if doing exh clearances). To remove cam its sorta of a tilt/tip/lift process. Thats about the only way I can explain it. With cam removed you can now take up one of the lifters. Only do one at a time to avoid mixing of parts. In the next pic you can see the valve spring where the shim sits once the lifter is removed. To the right you can see the other lifter still in place.

My shims stayed stuck to the underside of the lifter. Keep this in mind when removing lifter. Place hand under it as soon as possible to prevent dropping into the engine somewhere. Heres a pic of the bottom of the lifter and the shim alongside of it.

Measure this shim with the micrometers to figure out what shim is required to put back in. Place new shim on top of valve as indicated in a previous picture. Then place lifter back in place. Repeat for any other lifters/shims.
Once this is complete you can start reassembling. Getting the cams back in is a bit tricky. It will probably take a couple of tries. When all is right you should be at your original marks on the cam sprockets and flywheel as you set up earlier. If all looks well re-install cam cover. On the KLX the torqueing sequence is stamped in the cover. Also on the KLX bolts #1 and #6 are the two that are longer. The cover goes torqued to 8.5 ft-lbs (or 102 inch-lbs if you prefer). I like like to torque in steps rather than full torque right from the beginning.
Next you can install the cam tensioner mount and then the spring.
Now, very slowly using the flywheel turn engine by hand several revolutions. If at any time a resistance (besides compression) is felt "STOP" you may have screwed something up. Hopefully this doesn't happen. All is good... perfect. Re-assemble the rest of the bike. This would also be an ideal time to shuff in a new spark plug while it's easy to get at as well.
Happy Wrenchin'.
Relic.
Last edited by Klxrelic; May 7, 2013 at 02:05 AM.
Senior Member
Joined: Oct 2010
Posts: 4,507
From: SW Idaho
1st Gear Member
thanks Relic.
I had mine done at the shop after purchasing it last fall. Next time I'll venture into it myself with a manual and your instructions in hand. Doesn't look tooooo difficult.
I had mine done at the shop after purchasing it last fall. Next time I'll venture into it myself with a manual and your instructions in hand. Doesn't look tooooo difficult.
Senior Member
Joined: Mar 2008
Posts: 3,406
From: N. Illinois
1st Gear Member
Great write up relic! Great title too, It will be easy for someone to search for it. Some times a great write up will get titled with something like "look what I did today" never to be seen again.
Dan


Senior Member
1st Gear Member
Joined: Apr 2011
Posts: 349
From: Fort Atkinson, WI
I have not checked my valves yet but it looks like a pain in the butt. My 87 mojave 250 is super easy. Once the cam cover is off, you only need a screw driver and wrench to adjust the cam's. I don't understand why kawasaki just didn't stay with the same design. Now the cam's need to come out!
Last edited by 2007 Green Machine; Apr 28, 2011 at 04:15 AM.
Senior Member
1st Gear Member
Joined: Sep 2009
Posts: 805
From: Guam
Nice writeup and pics. I would add suggestion of stuffing a rag in down in the side of the head where the cam chain dissapears to prevent anything accidently dropped from falling down in the engine.
Cheers Jim
Cheers Jim