
machining 101

Thread Starter
|
Senior Member
1st Gear Member
Joined: Dec 2007
Posts: 2,092
From: terrorizing southeastern norf carolina
(lol.. ted.. if this is in the wrong place, feel free to move it.. i KNOW you're gonna read this and nitpick..)
ok, keeids.. its borderline magical when someone transforms a hunkof metal into a working component.
today, i'll show ya how i made my little shifter peg i'm so very proud of.. lol..sorry if the pics suck.. it took 2 hours of batteling my junk *** phone and multiple throws across the room, taunting, name calling, and threats to make this a reality..
ok.. the rough size of this little thing just ended up being about .630" so almost an 1/8 of an inch (.125") over a half, or 5/8.. about..
i just literally threw it in the lathe and picked a nice size.. you may want a more solid game plan..
anyways. i started off with a very common grade aluminum. 6061 T6 round stock. it's 3/4" (.750").. this grade of metal has a 45,000 PSI tensile stenght, and the "T" denotes the temper of the metal. theres T4, T5, T6.. T6 is pretty strong, and very common and a decent grade of aluminum to work with.. exceptional machinability, and can be welded.
theres tougher aluminum out ther, like 7075, which has a 120,000 PSI tensile strength but CAN'T be welded.. but is easily machined.
so, here along with the first one i made the other day, i have the round stock on the band saw getting a rough size.. i usually add about another .100" or so for good reason and measure.. just so i have more than i need.. we can always remove material easier..
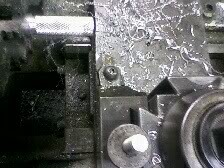
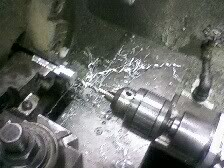
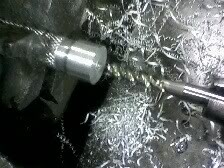
here we are with the metal cut to length and already chucked up in the lathe. it's a sharp somethin or other lathe.. good machine tho.. 3 jaw self-centering chuck, and a carbide triangular cutting insert is in the toolholder.
whittleing it down from .750" to about .630"
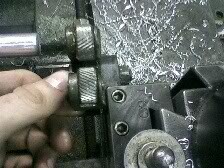
ok.. this toolholder is a modular thingy.. i can change out tools by turning that little lever at the top to the rear, and this unlocks a dovetail slide on the side..
heres a view of that dovetail..
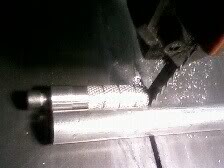
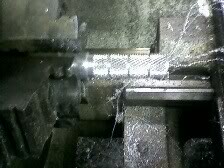
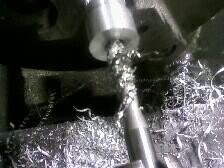
ok.. withthe metal at dimension, i wanted to add a knurling to add a lil extra grip.. this is the magical device that accomplishes this task. its basically two small helical gears in opposition that compress the metal into shape.
heres a little action shot.. it fits tight on the metal.. but not TOO tight.. gotta wind it in and me personally, i just use good judgement.. its a "feel" thing.. can't go too deep, otherwise they'll be all gummed up and distorted.. too little will render only light knurling.
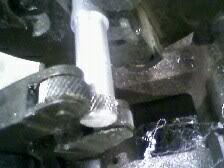
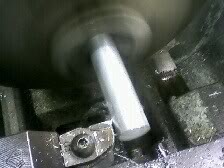
o.k. i just feed this thing to the left.. it's pretty much self-tracking and as long as you keep a steady crank on the wheel to move the tool, it'll produce a nice finish, no matter what you're doing.. the knuring i'm still figuring out, i think this is like the 3rd time doing it, but it seems pretty straight forward. i don't use the power feed, either.. just going off that "feel" again..
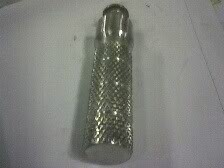
now, with this thing knurled as far as i want it, it's time to add some little grooves for fun.. you don't HAVE to do this, it's more asthetics than anything.. but i switched out the knurler for the carbide cutting insert tool again.
heres te piece getting its first groove on..
lol
and here it is after thice times grooving..
ok.. i'm pretty much done with this end, other than facing off the saw-cut rough end .. i just run that little insert across the face of this part to produce a nice, smooth finish and trim it to length at the same time.
ok.. once i face it off.. i take it out of the jaws..
it's a lil hard to see, but if ya look closely, you can see nasty little marks where the jaws were tightly clamped on the remaining rod to hold it.. made two side-by-side flat spots at 120* around the part.. 6 marks in all.. NO! i'm a perfectionist.. so nah.. we'regonna make that go away..
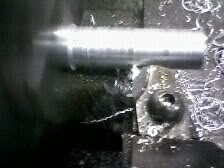
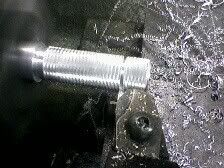
the less you hold on to, the tighter you have to clamp on it. so now with it flipped and a whole bunch to hold on to, (and uber grippy knurled, at that) we can gently clamp for our next operation.. turning the big end down, facing it, bevelling it, and drilling and tapping the mounting hole.
the angle the insert is at permits me to put a 45* angle on the end of it. i just run the insert into the part til it lightly touches the skinnier end where the grippies are at, and roll the insert into the bigger end, making the bevel. i then move from right to left across it all to produce a nice, smooth and flowing surface.i start from the bevel in the middle, knock out the angle and move left, then i start at the far right and move over the bigger end slowlyto the left..
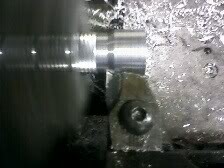
this end is nasty, too, and uneven, so i face this end now to size.
Oooooo .. pretttty
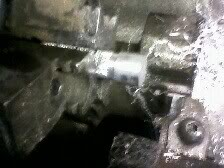
now the next to last step. drilling the hole so we can tappety tap it out to 5/16-18
on this thread size, you'll use a letter "F" drill bit. on a 24 thread pitch, you'll you an "I". double check me, tho.. lol
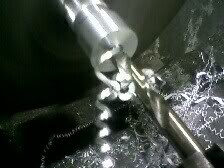
at the farright is another toolholder thingy that has a retracting sleeve type deal. not sure of the name, but this thing will hold a centering device called a "live center" or can accept a drill bit chuck like this.
just slowly feed in the bit.. crank it back out to remove the chips before the compact inside and break the bit, or weld themselves in the hole..
i drilled pretty deep on this..probably an inch or so.. A. so i have plenty of room for lots of thread.. B. to make is as light as possible.
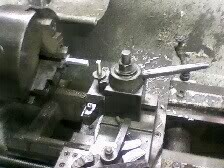
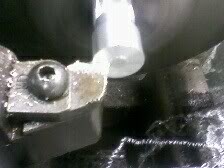
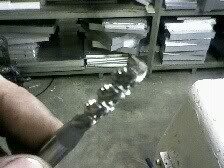
ok.. this creepy looking tool is just a regular tap. it just has a helix on the flutes to pull the chips out of the hole instead of pushing them, like a straight flute tap would. i don't want the chips to pack in there.. i reccomend spiral flute taps.. they're wicked. you can also form tap this as well, which might even be better..
if you've never heard of form tapping, basically it's like a screw.. it rolls the threads into the metal, and just shapes them in. NO chips, so you can tap a deep *** blind (closed) hole without breaking the tap or bottoming it out falsely on chips..
ok..I ALWAYS lube my tool before sticking it in a hole. the deeper ya go, the more lube you'll want..
that last thing you wanna do is ruin your tool! (especially in a deep hole with no lube)
in the chuck and oiled up..
now, on my turning and drilling, i spun i at 700RPM. on this, i cranked it down to 45RPM and carefully fed the tap in til it started to turn. i knew it was bottomed out at that time. i left it a little on the loose side in the chuck so when it DID bottom out, it wouldn't break off in the part.
small taps you can't really do this with, but i wanted alot of thread, and this size tap i know wasn't going to break under careful supervision and all..
tap being retracted..
ok!! thats it! parts done!
now, take it out, clean it up, debur the thing and do what ya want with it.
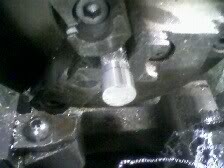
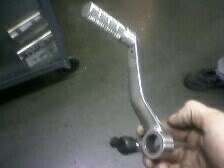
this is how it looked..
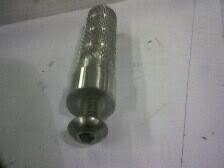
and here it is on my shifter, finally!! yay..
i had a few more, but my dumbass phone must not have transferered all of them, and it's 5am right now. so F it. you get the picture (pardon the pun)
and after this, you can go read a bike mag and stare at THE HOTTEST *** chick in the universe.. and take pride in knowing you saved an assload of money and did a good job on building something.. not buying it..
have fun and be safe!!
hope ya liked this and thanks for wasting your time with me!
ok, keeids.. its borderline magical when someone transforms a hunkof metal into a working component.
today, i'll show ya how i made my little shifter peg i'm so very proud of.. lol..sorry if the pics suck.. it took 2 hours of batteling my junk *** phone and multiple throws across the room, taunting, name calling, and threats to make this a reality..
ok.. the rough size of this little thing just ended up being about .630" so almost an 1/8 of an inch (.125") over a half, or 5/8.. about..
i just literally threw it in the lathe and picked a nice size.. you may want a more solid game plan..
anyways. i started off with a very common grade aluminum. 6061 T6 round stock. it's 3/4" (.750").. this grade of metal has a 45,000 PSI tensile stenght, and the "T" denotes the temper of the metal. theres T4, T5, T6.. T6 is pretty strong, and very common and a decent grade of aluminum to work with.. exceptional machinability, and can be welded.
theres tougher aluminum out ther, like 7075, which has a 120,000 PSI tensile strength but CAN'T be welded.. but is easily machined.
so, here along with the first one i made the other day, i have the round stock on the band saw getting a rough size.. i usually add about another .100" or so for good reason and measure.. just so i have more than i need.. we can always remove material easier..
here we are with the metal cut to length and already chucked up in the lathe. it's a sharp somethin or other lathe.. good machine tho.. 3 jaw self-centering chuck, and a carbide triangular cutting insert is in the toolholder.
whittleing it down from .750" to about .630"
ok.. this toolholder is a modular thingy.. i can change out tools by turning that little lever at the top to the rear, and this unlocks a dovetail slide on the side..
heres a view of that dovetail..
ok.. withthe metal at dimension, i wanted to add a knurling to add a lil extra grip.. this is the magical device that accomplishes this task. its basically two small helical gears in opposition that compress the metal into shape.
heres a little action shot.. it fits tight on the metal.. but not TOO tight.. gotta wind it in and me personally, i just use good judgement.. its a "feel" thing.. can't go too deep, otherwise they'll be all gummed up and distorted.. too little will render only light knurling.
o.k. i just feed this thing to the left.. it's pretty much self-tracking and as long as you keep a steady crank on the wheel to move the tool, it'll produce a nice finish, no matter what you're doing.. the knuring i'm still figuring out, i think this is like the 3rd time doing it, but it seems pretty straight forward. i don't use the power feed, either.. just going off that "feel" again..
now, with this thing knurled as far as i want it, it's time to add some little grooves for fun.. you don't HAVE to do this, it's more asthetics than anything.. but i switched out the knurler for the carbide cutting insert tool again.
heres te piece getting its first groove on..
lol
and here it is after thice times grooving..
ok.. i'm pretty much done with this end, other than facing off the saw-cut rough end .. i just run that little insert across the face of this part to produce a nice, smooth finish and trim it to length at the same time.
ok.. once i face it off.. i take it out of the jaws..
it's a lil hard to see, but if ya look closely, you can see nasty little marks where the jaws were tightly clamped on the remaining rod to hold it.. made two side-by-side flat spots at 120* around the part.. 6 marks in all.. NO! i'm a perfectionist.. so nah.. we'regonna make that go away..
the less you hold on to, the tighter you have to clamp on it. so now with it flipped and a whole bunch to hold on to, (and uber grippy knurled, at that) we can gently clamp for our next operation.. turning the big end down, facing it, bevelling it, and drilling and tapping the mounting hole.
the angle the insert is at permits me to put a 45* angle on the end of it. i just run the insert into the part til it lightly touches the skinnier end where the grippies are at, and roll the insert into the bigger end, making the bevel. i then move from right to left across it all to produce a nice, smooth and flowing surface.i start from the bevel in the middle, knock out the angle and move left, then i start at the far right and move over the bigger end slowlyto the left..
this end is nasty, too, and uneven, so i face this end now to size.
Oooooo .. pretttty
now the next to last step. drilling the hole so we can tappety tap it out to 5/16-18
on this thread size, you'll use a letter "F" drill bit. on a 24 thread pitch, you'll you an "I". double check me, tho.. lol
at the farright is another toolholder thingy that has a retracting sleeve type deal. not sure of the name, but this thing will hold a centering device called a "live center" or can accept a drill bit chuck like this.
just slowly feed in the bit.. crank it back out to remove the chips before the compact inside and break the bit, or weld themselves in the hole..
i drilled pretty deep on this..probably an inch or so.. A. so i have plenty of room for lots of thread.. B. to make is as light as possible.
ok.. this creepy looking tool is just a regular tap. it just has a helix on the flutes to pull the chips out of the hole instead of pushing them, like a straight flute tap would. i don't want the chips to pack in there.. i reccomend spiral flute taps.. they're wicked. you can also form tap this as well, which might even be better..
if you've never heard of form tapping, basically it's like a screw.. it rolls the threads into the metal, and just shapes them in. NO chips, so you can tap a deep *** blind (closed) hole without breaking the tap or bottoming it out falsely on chips..
ok..I ALWAYS lube my tool before sticking it in a hole. the deeper ya go, the more lube you'll want..
that last thing you wanna do is ruin your tool! (especially in a deep hole with no lube)
in the chuck and oiled up..
now, on my turning and drilling, i spun i at 700RPM. on this, i cranked it down to 45RPM and carefully fed the tap in til it started to turn. i knew it was bottomed out at that time. i left it a little on the loose side in the chuck so when it DID bottom out, it wouldn't break off in the part.
small taps you can't really do this with, but i wanted alot of thread, and this size tap i know wasn't going to break under careful supervision and all..
tap being retracted..
ok!! thats it! parts done!
now, take it out, clean it up, debur the thing and do what ya want with it.
this is how it looked..
and here it is on my shifter, finally!! yay..
i had a few more, but my dumbass phone must not have transferered all of them, and it's 5am right now. so F it. you get the picture (pardon the pun)
and after this, you can go read a bike mag and stare at THE HOTTEST *** chick in the universe..
and take pride in knowing you saved an assload of money and did a good job on building something.. not buying it..have fun and be safe!!
hope ya liked this and thanks for wasting your time with me!

Senior Member
1st Gear Member
Joined: Jun 2008
Posts: 172
From: Austin
I would have to agree that it is definitely a beautiful thing transforming a hunk of metal into anything! I'm a welder/metal worker and I found this post real interesting! I have been wanting to make somethings for my bike, and this is quite awesome! I replaced the diamond plating that you see in the picture with a custom stainless steel undertail that I made. What else have you made custom yourself? I have access to all of these tools, including a lathe, I've just never thought about that! Once again, very cool. Hopefully you will have some morehow to stuff on some custom bike parts


Thread
Thread Starter
Forum
Replies
Last Post

