DIY KLX seat modification (flatten)
#1
 11-08-2014, 06:27 PM


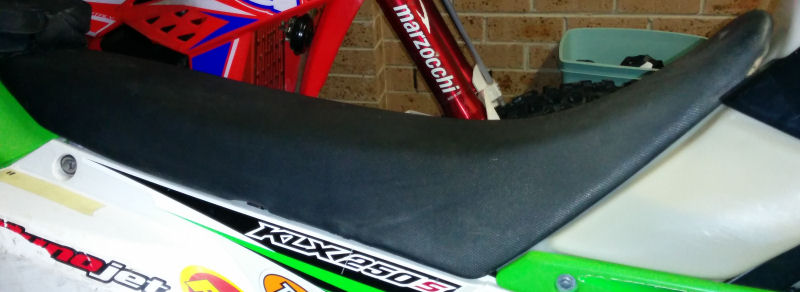
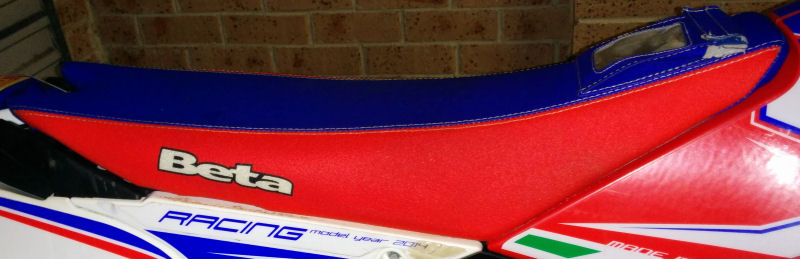
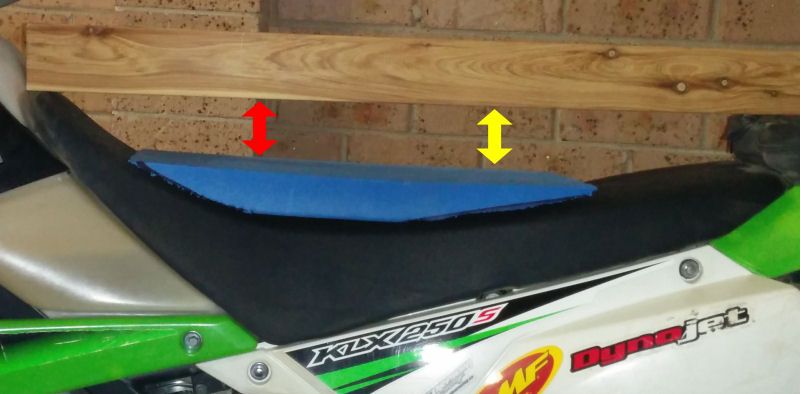
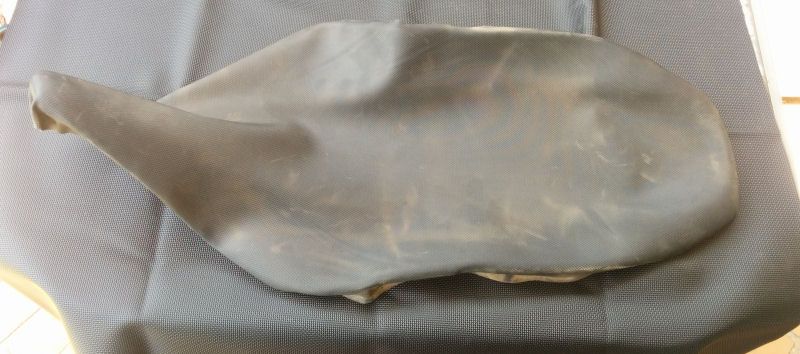
One of the things that I dislike about the KLX seat is that it is "cupped out" so that it rises up to the tank, and up to the rear from the middle of the seat. By contrast, my Beta's seat is pretty flat which makes sliding backwards and forwards on the seat pretty easy.
KLX seat:
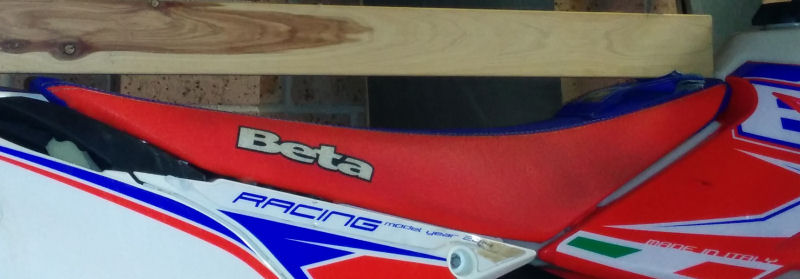
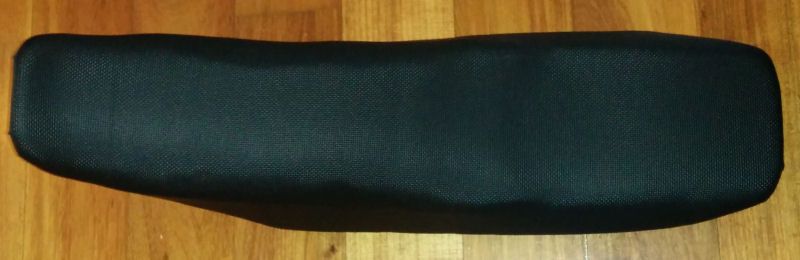
Beta seat:
If you look at most other modern enduro/trail bikes they also seem to have flatter seats, so there must be something in it. So I want to see if I can modify the seat to make it a little flatter. Fortunately I find the KLX seat to be a little low in stock form anyway, so adding foam to the seat to flatten it out should not be a problem for me.
I contacted a couple of places that do motorcycle seats but none of them I spoke to had gripper seat material - they all only stocked marine vinyl which I think would be too smooth. They said that it would be pretty expensive to reshape the foam too, but did say it should be something I can do myself if I get closed cell foam from Clark Rubber. When I went to Clark though they weren't particularly useful as they seemed more familiar with foam for sofa's and things rather than motorcycle seats. I did find a knee pad/cushion that looks like it will do the trick though, so I bought that.
I have no real idea what I am doing so I did a bit of a search online for how to shape the foam and stuff. I came across this site which looks pretty useful - Modify Seat
I roughly marked out the pieces I thought should be removed to get the knee pad into the right shape to insert. I took to it with a hacksaw just to remove the biggest pieces and see how it might look. Putting it on top of the seat it looks like it might work.
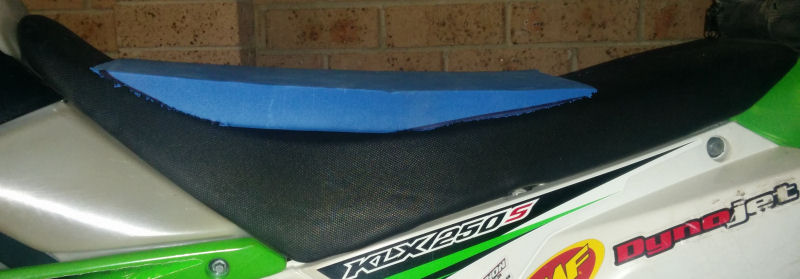
I obviously have a fair amount of sanding and shaping to do once I remove the seat cover so that I can get the insert mated up nicely to the stock foam. Because the knee pad is wider than the KLX seat it looks like I will be able to make a slightly wider and more comfortable section to sit on (without compromising my ability to slide on the seat) like my Beta's Seat Concepts foam.
When it comes to the cover, obviously by adding the extra foam the stock seat cover will no longer fit (they just do not supply enough excess material to allow that) so I need new material. Because the upholsters I spoke to didn't have anything suitable on hand I turned to the web again. I managed to find some "Factory Effex Black Gripper Seat Cover Material" on eBay so have ordered that. There will be more than enough material to cover the seat, but I reckon it'll be a little bit of a challenge to do. I'm looking forward to the challenge though.
KLX seat:
Beta seat:
If you look at most other modern enduro/trail bikes they also seem to have flatter seats, so there must be something in it. So I want to see if I can modify the seat to make it a little flatter. Fortunately I find the KLX seat to be a little low in stock form anyway, so adding foam to the seat to flatten it out should not be a problem for me.
I contacted a couple of places that do motorcycle seats but none of them I spoke to had gripper seat material - they all only stocked marine vinyl which I think would be too smooth. They said that it would be pretty expensive to reshape the foam too, but did say it should be something I can do myself if I get closed cell foam from Clark Rubber. When I went to Clark though they weren't particularly useful as they seemed more familiar with foam for sofa's and things rather than motorcycle seats. I did find a knee pad/cushion that looks like it will do the trick though, so I bought that.
I have no real idea what I am doing so I did a bit of a search online for how to shape the foam and stuff. I came across this site which looks pretty useful - Modify Seat
I roughly marked out the pieces I thought should be removed to get the knee pad into the right shape to insert. I took to it with a hacksaw just to remove the biggest pieces and see how it might look. Putting it on top of the seat it looks like it might work.
I obviously have a fair amount of sanding and shaping to do once I remove the seat cover so that I can get the insert mated up nicely to the stock foam. Because the knee pad is wider than the KLX seat it looks like I will be able to make a slightly wider and more comfortable section to sit on (without compromising my ability to slide on the seat) like my Beta's Seat Concepts foam.
When it comes to the cover, obviously by adding the extra foam the stock seat cover will no longer fit (they just do not supply enough excess material to allow that) so I need new material. Because the upholsters I spoke to didn't have anything suitable on hand I turned to the web again. I managed to find some "Factory Effex Black Gripper Seat Cover Material" on eBay so have ordered that. There will be more than enough material to cover the seat, but I reckon it'll be a little bit of a challenge to do. I'm looking forward to the challenge though.
#2
11-08-2014, 06:28 PM
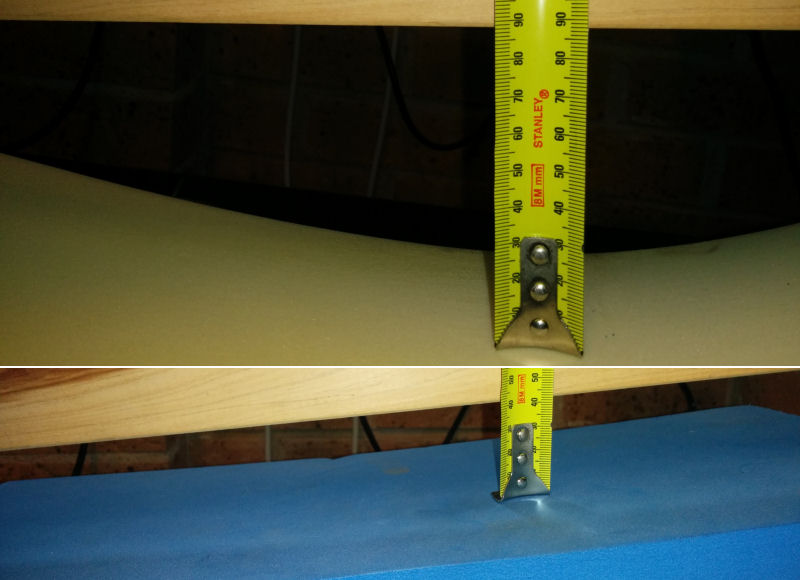
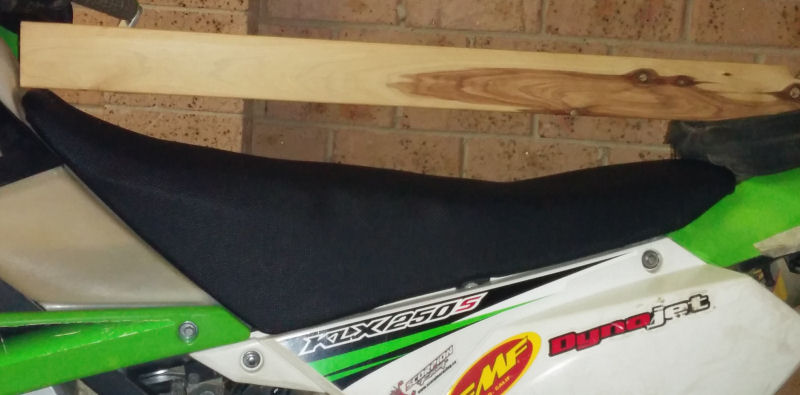
Taking the seat and cover off, then putting a plank on it you can see just how cupped out the seat is before it ramps up quite drastically at the tank.
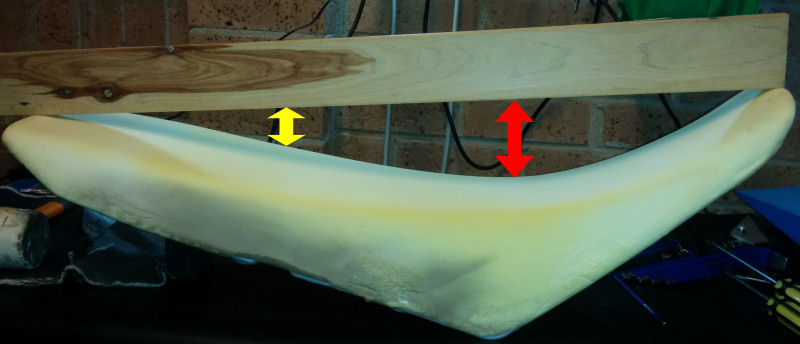
With the foam insert I had roughly cut to shape you can see that I should get a must flatter seat - which is the whole point of the exercise.
Putting the plank on my Beta's seat I noticed that although I thought the Beta seat was flat, there is actually a little difference. Oh well, I'll just see how things turn out.
With the new foam insert the depth of the "cupping" is cut from about 90mm to about 40mm, so the seat is not going to be "short person friendly"... guess it's a good thing I'm not vertically challenged!
I got a tub of foam rubber glue from Clark Rubber and glued the new foam on. I thought it would be a good idea to use tie-downs to secure the new foam down nice and firm to make sure it bonded nicely. When I took the straps off I realised that the foam I had chosen appears to be memory foam... hope that doesn't end up being a problem.
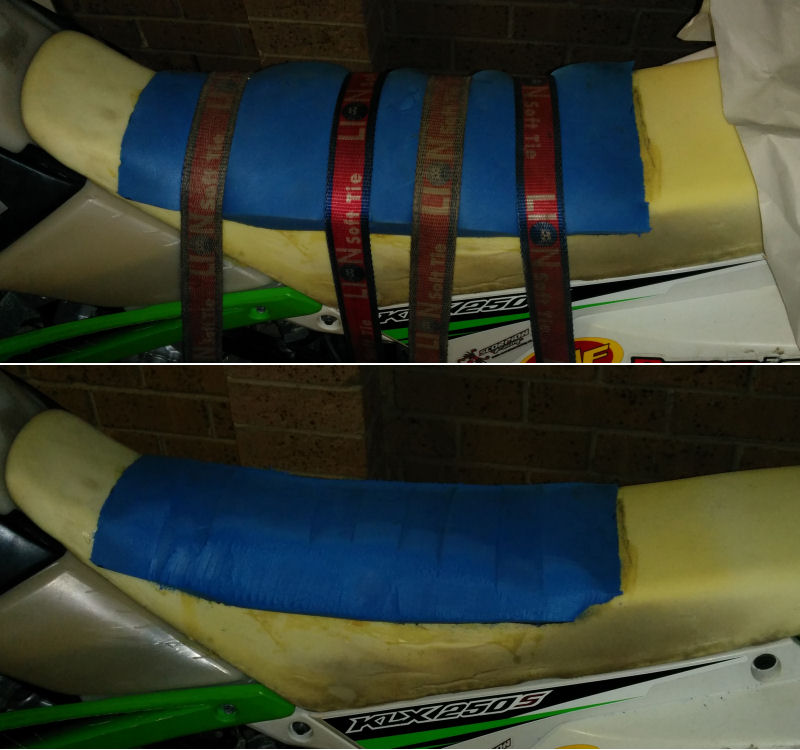
When it came to shaping the foam, I was concerned about how it would go. Armed only with a craft knife and a sanding block I dod what I could to get the rough shape I thought would be comfortable. I will be the first to admit it isn't a particularly good job that I did, but I figure I only need to be able to sit on it comfortably... it doesn't need to be that pretty. It was at this stage I also realised I may have gotten the foam fitted a little too far forward on the seat meaning the seat is still cupped out, but it is a shallower cup and further back. It'll be interesting to see how this feels.

Putting the old seat cover onto the new gripper material sheet it is clear that I have more than enough material to cover the seat. If I stuff it up too badly at least I will be able to give it another go.
Fitting the cover was a bit of a frustrating job. My staple gun obviously isn't strong enough to penetrate the plastic seat base properly, and even warning the plastic with my heat gun didn't help that much. I ended up pushing in each staple properly with the nose of my pliers (as the staples only half seated from the gun. I followed a mates advice of making sure the material stretched along the length of the seat and the non-stretchy direction was across the seat. With the cover on the unevenly shaped foam insert under it is a lot more obvious that I had expected. Oh well.
Fitting the seat again with the plank to see what the new shape was like, it looks like I have a rear sloping and uneven seat. I hope it isn't a problem when riding... oh wait, I'm supposed to be standing most of the time anyway aren't I?
With the foam insert I had roughly cut to shape you can see that I should get a must flatter seat - which is the whole point of the exercise.
Putting the plank on my Beta's seat I noticed that although I thought the Beta seat was flat, there is actually a little difference. Oh well, I'll just see how things turn out.
With the new foam insert the depth of the "cupping" is cut from about 90mm to about 40mm, so the seat is not going to be "short person friendly"... guess it's a good thing I'm not vertically challenged!
I got a tub of foam rubber glue from Clark Rubber and glued the new foam on. I thought it would be a good idea to use tie-downs to secure the new foam down nice and firm to make sure it bonded nicely. When I took the straps off I realised that the foam I had chosen appears to be memory foam... hope that doesn't end up being a problem.
When it came to shaping the foam, I was concerned about how it would go. Armed only with a craft knife and a sanding block I dod what I could to get the rough shape I thought would be comfortable. I will be the first to admit it isn't a particularly good job that I did, but I figure I only need to be able to sit on it comfortably... it doesn't need to be that pretty. It was at this stage I also realised I may have gotten the foam fitted a little too far forward on the seat meaning the seat is still cupped out, but it is a shallower cup and further back. It'll be interesting to see how this feels.
Putting the old seat cover onto the new gripper material sheet it is clear that I have more than enough material to cover the seat. If I stuff it up too badly at least I will be able to give it another go.
Fitting the cover was a bit of a frustrating job. My staple gun obviously isn't strong enough to penetrate the plastic seat base properly, and even warning the plastic with my heat gun didn't help that much. I ended up pushing in each staple properly with the nose of my pliers (as the staples only half seated from the gun. I followed a mates advice of making sure the material stretched along the length of the seat and the non-stretchy direction was across the seat. With the cover on the unevenly shaped foam insert under it is a lot more obvious that I had expected. Oh well.
Fitting the seat again with the plank to see what the new shape was like, it looks like I have a rear sloping and uneven seat. I hope it isn't a problem when riding... oh wait, I'm supposed to be standing most of the time anyway aren't I?
#4
11-08-2014, 08:21 PM
Closed cell foam can also be had at white water boating outfits, in various thicknesses. They also sell "Dragonskin" which is like a flexible cheese grater for shaping and sanding.
If you don't like what you've done so far, add more foam where you need it and then sand/shape it with the dragonskin.
If you don't like what you've done so far, add more foam where you need it and then sand/shape it with the dragonskin.
#5
11-09-2014, 02:04 AM
ive used a flap wheel on a grinder to shape foam before
works well
but ive found any mistake shows up unless you cover the foam with something first
strangely at least on the 250s I found the stock seat way more comfortable then my drz used to be, that felt like sitting on a 2x4
but more foam the better not everyone can stand all day I like to sit too
works well
but ive found any mistake shows up unless you cover the foam with something first
strangely at least on the 250s I found the stock seat way more comfortable then my drz used to be, that felt like sitting on a 2x4
but more foam the better not everyone can stand all day I like to sit too
#6
11-09-2014, 11:30 AM

Most all the stuff I've seen on doing seat foam has used either a disc or DA sander like you'd use on body work. They shape it with them after rough cut with a bread knife.
I did a couple of seat covers and found you can make a nice multi-piece cover by making a cardboard template of the top and sides. Then have them sewn together. You see that on the Beta seat, double stitching too It is also a point where complementary or contrasting colors could come into play. I like any color other than black, because any color other than black is seriously cooler when it sits in the sun.
I plan to test out my skills to make a step up seat for the 650, flattening the rider portion by some combination of cutting and adding foam as needed. My need is an actual horizontal-to-the-ground rider space for more room to move. The plan is to make the small passenger space horizontal too. I guess a dual sport king-queen seat to borrow a chopper term.
This one is a bit tall, but somewhat of an example:

The 650 has a really tall nose on the seat and a cut that has you sliding down into it constantly. It takes an effort after a while:

Getting proper foam without paying out the nose is the biggest problem. It both hard to find foam and expensive if you do.
Keep hacking at it.
I did a couple of seat covers and found you can make a nice multi-piece cover by making a cardboard template of the top and sides. Then have them sewn together. You see that on the Beta seat, double stitching too It is also a point where complementary or contrasting colors could come into play. I like any color other than black, because any color other than black is seriously cooler when it sits in the sun.
I plan to test out my skills to make a step up seat for the 650, flattening the rider portion by some combination of cutting and adding foam as needed. My need is an actual horizontal-to-the-ground rider space for more room to move. The plan is to make the small passenger space horizontal too. I guess a dual sport king-queen seat to borrow a chopper term.
This one is a bit tall, but somewhat of an example:
The 650 has a really tall nose on the seat and a cut that has you sliding down into it constantly. It takes an effort after a while:
Getting proper foam without paying out the nose is the biggest problem. It both hard to find foam and expensive if you do.
Keep hacking at it.
Last edited by klx678; 11-09-2014 at 11:36 AM.

Thread
Thread Starter
Forum
Replies
Last Post