
valve check/adjustment complete

Thread Starter
|
Senior Member
1st Gear Member
Joined: Jun 2011
Posts: 1,135
From: San Francisco, CA
2009 klx250sf - 8,600 miles...first valve check and shim replacement...both inlet valves were out of spec...6/2/12...replace the spark plug ngk cr8e while you have it all open...klxrelic's instructions were quite helpful... https://www.kawasakiforums.com/forum...acement-35136/
remove side plastic, saddle and fuel tank...

remove the three valve cover bolts evenly by skipping from bolt to bolt, turn by tune and continue until all three are all out...

remove the two bolts for the small black canisters for overflow fuel...pull off the round thing on the left...take the fan out..remove spark plug and cover with rag..the valve cover comes out best lifting the right and pulling it out straight and flat through the left...

remove the two holes near the shifter (1 inch circle and 2 inch circle)...turn the bolt in the 2 inch circle counter clockwise...until T (after F)...might take a few complete rotations to get it ready to check the valves...

after checking, if out of spec....remove the rear cam...stick something long to hold the cam chain (don't drop it down)...remove the front cam...magnet to remove the valve covers...replace shims...clean all the factory silicon off....add some sealant near the half moons and thin layer around...put it all back together..

valve adjustment made a huge difference...really woke up the bike...pulls effortlessly to 90 mph and the speed just kept on increasing....released the throttle after reaching about 98 mph on the highway...
remove side plastic, saddle and fuel tank...
remove the three valve cover bolts evenly by skipping from bolt to bolt, turn by tune and continue until all three are all out...
remove the two bolts for the small black canisters for overflow fuel...pull off the round thing on the left...take the fan out..remove spark plug and cover with rag..the valve cover comes out best lifting the right and pulling it out straight and flat through the left...
remove the two holes near the shifter (1 inch circle and 2 inch circle)...turn the bolt in the 2 inch circle counter clockwise...until T (after F)...might take a few complete rotations to get it ready to check the valves...
after checking, if out of spec....remove the rear cam...stick something long to hold the cam chain (don't drop it down)...remove the front cam...magnet to remove the valve covers...replace shims...clean all the factory silicon off....add some sealant near the half moons and thin layer around...put it all back together..
valve adjustment made a huge difference...really woke up the bike...pulls effortlessly to 90 mph and the speed just kept on increasing....released the throttle after reaching about 98 mph on the highway...
Last edited by ahnh666; Jun 3, 2012 at 12:07 AM.

Senior Member
1st Gear Member
Joined: Mar 2012
Posts: 583
From: Spokane, WA
Thanks for this.
We should have a valve adjustment and carb cleaning sticky on the forum.
I am cleaning the carbs and doing the valves on my Ninja and that forum has a nice Wiki with some great write ups.
We should have a valve adjustment and carb cleaning sticky on the forum.
I am cleaning the carbs and doing the valves on my Ninja and that forum has a nice Wiki with some great write ups.
Last edited by stephenmarklay; Jun 3, 2012 at 08:18 PM.
Thread Starter
|
Senior Member
1st Gear Member
Joined: Jun 2011
Posts: 1,135
From: San Francisco, CA
i just test the moto on the 101 at sea level south of candlestick....it's flat completely for few miles...think i did have some back wind to help...later on my way back...winds were crazy...wot was 80 mph back to city...
Senior Member
1st Gear Member
Joined: Mar 2011
Posts: 695
ahnh666: "stick something long to hold the cam chain (don't drop it down)"
The "don't drop it down" part CAN NOT be over emphasized! The very first motorcycle engine rebuild I ever did as a kid 20 years ago took twice as long as it should have because I dropped the cam chain down into the crank-case
Use a couple lengths of wire to tie both loose ends of the the cam chain back from falling into the engine. If you have not done this and the the cam chain has already disappeared on you, you MAY be able to retrieve it with an pice of coat hanger wire, or a magnet...
Thread Starter
|
Senior Member
1st Gear Member
Joined: Jun 2011
Posts: 1,135
From: San Francisco, CA
you do need a valve adjustment feeler gauges to check the valve clearance...make sure to get one with both mm and inch measurements...
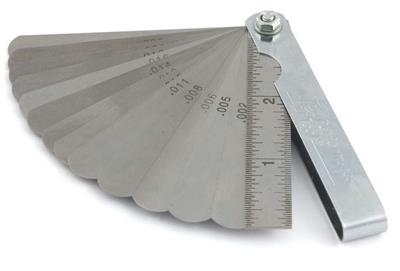
you need a spark plug socket/wrench..you want to have a strong extendable magnet...white out or nail polish works great to mark the cam chain pin and cam....i used blue nail polish because kawasaki already marked up the cams with white...kawasaki also used a lot of silicon on the valve cover and half moon....make sure to remove it all off...that took some time scraping all the silicon off...i was told one of causes of oil leaks around the half moon and valve cover is from not removing all the factory silicon off after a valve check...there was a thick layer of silicon around the half moon and the entire valve cover...it was not easy taking it all off without dropping the silicon in...
you also need one of these to measure the shims...new valve shims have the measurements on the shims, but if you are using old shims..just make sure to measure the width...
Last edited by ahnh666; Jun 4, 2012 at 02:58 PM.

Thread
Thread Starter
Forum
Replies
Last Post