Replacing stator on -2007 Ninja 250
#1
 04-13-2009, 04:50 AM

Join Date: Aug 2007
Location: Bozeman, MT
Posts: 551
Thought this was a good write-up from another forum. I copied it for use over here and so we don't lose it.
Courtesy of speeddeemn of KawiForums.com
How To: Remove and Replace Stator Cover 05/06
I saw a post with questions on how to replace the stator cover yesterday. Since I was taking mine off to put a Woodcraft CFM cover on, I thought I�d take pictures and document the process for anyone needing to do this in the future. This application is specifically for the Woodcraft cover, but it should still be of help to anyone needing to replace their cover with a stock or other aftermarket cover. These directions are for the stator cover removal and replacement only. They assume that you already know how to remove the fairings and other parts required to get to the stator cover. I probably went overboard on the steps and pictures, but for the non-mechanically inclined, it�s better to have too many than not enough. In other words, I wrote this so that my wife could probably even do it! Here goes...
Tools Needed:
Ratchet
8mm Socket
Flat Head Screwdriver
Impact Driver (in some cases)
Torx T-30 Socket Bit
Loctite
With the bike on stands, you do not need to drain the oil. As long as your bike is on a set of stands, only a few drips should come out. I placed a pan underneath to catch the drips, but it was literally only a few drips and that was it. I�ve never done this job without stands, but my guess is that you will need to drain the oil first if you are attempting to do this job while the bike is on it�s kickstand.
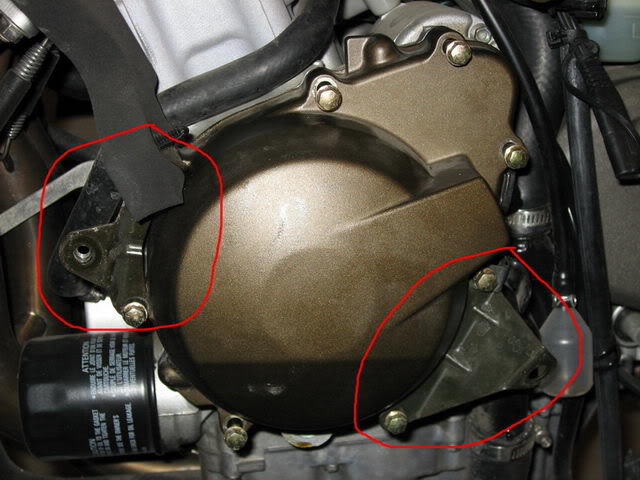
Step 1: Removal of the fairing brackets from the stator cover
To remove the fairing brackets circled below, simply remove the 4 bolts holding them on with an 8mm socket. You can visibly see 3 of the bolts. The 4th one is hidden behind the foam piece in the upper left hand side of the picture.
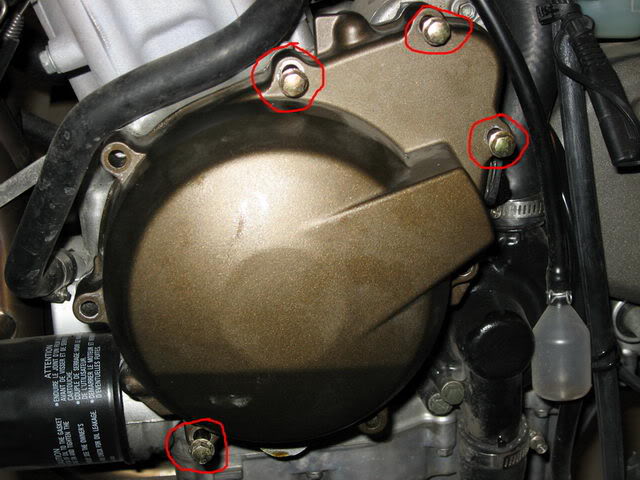
Step 2: Removal of remaining stator cover bolts
Take off the 4 remaining stator cover bolts circled below using an 8mm socket.
Step 3: Removal of the stator cover
Once the bolts are all out, the stator cover just pulls straight off. You may need to get a flat screwdriver and switch off prying on one side and then the other until it comes loose. The reason for this is because there are roll pins in two of the bolt holes that help line the stator cover up with the holes on the block. BE CAREFUL when prying with the screwdriver because you do not want to damage any of the surfaces. A little twist is all it takes� you don�t need a pry bar. Once you can see that the cover is separated from the block it may seem like it is still sticking. This is because there is a strong magnet inside. Just give it a good pull and it will pull away.
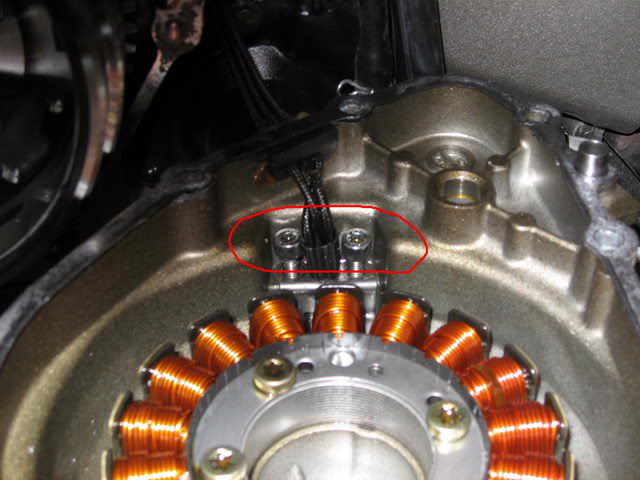
Step 4: Removing the wire bracket from the inside of the stator cover
To remove the bracket, unscrew and remove the two screws I have circled below using a hex head wrench (I can�t remember the size .. you�ll figure it out). In the picture, they are already loosened.
Step 5: Removing the wire grommet
To remove the wire grommet, you need to first remove the gasket that goes around the circumference of the stator cover.
After the gasket is removed, you will see that the rubber grommet is held in with silicone. Take a flat screwdriver and work it under the grommet until it breaks loose. Be careful not to chew up the underlying wires.

Once the grommet is broken loose and out it will look like this:

Now would be a good time to clean any gasket residue off the engine block surface.
Step 6: Loosening stator wires from the harness & lowering the stator cover
This step is not a necessity, but it sure makes the job easier if your bike is already tore down. When you are at this point, the stator cover is hanging down off the side of the bike and there is not much give in the wires. To give yourself more room to work and get the stator bolts out easier, I unplugged the stator wire plug from underneath the gas tank as pictured below. The plug I am referring to is the one between my fingers in the second picture. When you find it, unplug it. Once unplugged, there is a little bendy bracket that holds the wire in place (can�t see it in any of the pictures). Bend that little bracket back and it will release the wire a bit and allow you to drop the stator cover down so that you have more room to work when you are trying to remove the bolts. Sorry I didn�t include pictures of removing the tank etc� but it was because I already had my bike tore down when I started.


After unplugging the wire and releasing the bendy bracket, you can pull on the stator wire to give yourself more slack to work with. You will still need to prop it up on something as it will not reach the floor but it gives you much more room as seen below:

Step 7: Removing the stator bolts
This is probably the most difficult portion of the job. The stator screws are held in with loctite and can be difficult to get out sometimes. They are tight! You will need a T-30 torx head bit for these bolts. Do not attempt to use the closest fitting hex head wrench or you WILL strip these. I was able to get mine out simply by using the T-30 bit on the end of a �� ratchet. However, I was taking extreme caution to keep the bit in straight. If you are unable to break yours loose with just a ratchet, or feel like you may strip them trying this, then I recommend putting the T-30 bit on the end of an impact driver:

Step 8: Removing the stator
With the stator bolts removed. To remove the stator, all you need to do is pull it straight out.

Step 9: Placing the stator in the new stator cover
Place the stator in the new cover taking the time to line the bolt holes up with the holes in the new cover. Once lined up, place loctite on the stator bolts, screw the bolts in the holes and tighten them up using your ratchet and T-30 torx bit. Make sure the stator wire is on the side of the cover that it needs to be on.
Step 10: Placing the wire bracket in the new stator cover
Place the wire bracket that was previously removed around the wire as pictured below. Once in place, put loctite on the screws and then insert and tighten both screws.
Step 11: Securing rubber wire grommet
With the bracket now in place, you will need to apply silicone to the groove that runs around the rubber grommet and place the grommet in place in the new stator cover. Wipe off the excess silicone and you are ready to put on the new gasket.
Step 12: Installing the gasket
Find the 2 roll pins. If you haven�t already taken them out, you will find them in 2 of the bolt holes in the old stator cover, or in two of the holes on the engine block. Take these pins and place them in the new stator cover as directed by the arrows below. After those are on, place the new gasket on the new stator cover as shown below.

Step 13: Install the new stator cover
Line the roll pins that you just put in the new cover with the appropriate holes on the block and push the cover in place. It may take a little wiggling to get it on all the way. Be sure to keep the gasket and grommet in place as you are putting it on. Remember the magnet when you go to put it on. It will grab the new cover pretty good as you get it close.
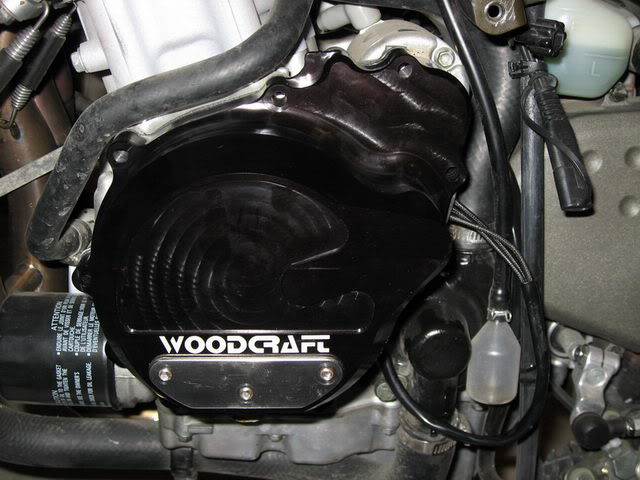
Step 14: Put fairing brackets and stator cover bolts on
The last step is to put the fairing brackets and stator cover bolts on with the 8mm socket.

Step 15: Plug the stator wires back in.
If you performed step 6 above, then you need to pull the stator wire back through the bike, route it under the bendy bracket and bend that back in place so that it holds the wire. Then plug it back in. That is it. You are done!
Don�t forget to put oil back in the bike if you chose to drain the oil.
Use heat resistant silicone, like Kawibond, not the stuff you buy at the hardware store to seal a crack in your house.
I actually got mine off without the use of an impact driver. However, if you have to use one ... your best bet is to set the stator cover flat on the ground (on a rag or something to keep it from getting scuffed) and have a friend hold it using both hands while you hammer the impact driver.
The fairings are tighter around the Woodcraft cover than they are around the OEM cover, however, my fairings to not actually make contact. If I remember correctly, the tightest spot is at about the 1:00 position.
Courtesy of speeddeemn of KawiForums.com
How To: Remove and Replace Stator Cover 05/06
I saw a post with questions on how to replace the stator cover yesterday. Since I was taking mine off to put a Woodcraft CFM cover on, I thought I�d take pictures and document the process for anyone needing to do this in the future. This application is specifically for the Woodcraft cover, but it should still be of help to anyone needing to replace their cover with a stock or other aftermarket cover. These directions are for the stator cover removal and replacement only. They assume that you already know how to remove the fairings and other parts required to get to the stator cover. I probably went overboard on the steps and pictures, but for the non-mechanically inclined, it�s better to have too many than not enough. In other words, I wrote this so that my wife could probably even do it! Here goes...
Tools Needed:
Ratchet
8mm Socket
Flat Head Screwdriver
Impact Driver (in some cases)
Torx T-30 Socket Bit
Loctite
With the bike on stands, you do not need to drain the oil. As long as your bike is on a set of stands, only a few drips should come out. I placed a pan underneath to catch the drips, but it was literally only a few drips and that was it. I�ve never done this job without stands, but my guess is that you will need to drain the oil first if you are attempting to do this job while the bike is on it�s kickstand.
Step 1: Removal of the fairing brackets from the stator cover
To remove the fairing brackets circled below, simply remove the 4 bolts holding them on with an 8mm socket. You can visibly see 3 of the bolts. The 4th one is hidden behind the foam piece in the upper left hand side of the picture.
Step 2: Removal of remaining stator cover bolts
Take off the 4 remaining stator cover bolts circled below using an 8mm socket.
Step 3: Removal of the stator cover
Once the bolts are all out, the stator cover just pulls straight off. You may need to get a flat screwdriver and switch off prying on one side and then the other until it comes loose. The reason for this is because there are roll pins in two of the bolt holes that help line the stator cover up with the holes on the block. BE CAREFUL when prying with the screwdriver because you do not want to damage any of the surfaces. A little twist is all it takes� you don�t need a pry bar. Once you can see that the cover is separated from the block it may seem like it is still sticking. This is because there is a strong magnet inside. Just give it a good pull and it will pull away.
Step 4: Removing the wire bracket from the inside of the stator cover
To remove the bracket, unscrew and remove the two screws I have circled below using a hex head wrench (I can�t remember the size .. you�ll figure it out). In the picture, they are already loosened.
Step 5: Removing the wire grommet
To remove the wire grommet, you need to first remove the gasket that goes around the circumference of the stator cover.
After the gasket is removed, you will see that the rubber grommet is held in with silicone. Take a flat screwdriver and work it under the grommet until it breaks loose. Be careful not to chew up the underlying wires.
Once the grommet is broken loose and out it will look like this:
Now would be a good time to clean any gasket residue off the engine block surface.
Step 6: Loosening stator wires from the harness & lowering the stator cover
This step is not a necessity, but it sure makes the job easier if your bike is already tore down. When you are at this point, the stator cover is hanging down off the side of the bike and there is not much give in the wires. To give yourself more room to work and get the stator bolts out easier, I unplugged the stator wire plug from underneath the gas tank as pictured below. The plug I am referring to is the one between my fingers in the second picture. When you find it, unplug it. Once unplugged, there is a little bendy bracket that holds the wire in place (can�t see it in any of the pictures). Bend that little bracket back and it will release the wire a bit and allow you to drop the stator cover down so that you have more room to work when you are trying to remove the bolts. Sorry I didn�t include pictures of removing the tank etc� but it was because I already had my bike tore down when I started.
After unplugging the wire and releasing the bendy bracket, you can pull on the stator wire to give yourself more slack to work with. You will still need to prop it up on something as it will not reach the floor but it gives you much more room as seen below:
Step 7: Removing the stator bolts
This is probably the most difficult portion of the job. The stator screws are held in with loctite and can be difficult to get out sometimes. They are tight! You will need a T-30 torx head bit for these bolts. Do not attempt to use the closest fitting hex head wrench or you WILL strip these. I was able to get mine out simply by using the T-30 bit on the end of a �� ratchet. However, I was taking extreme caution to keep the bit in straight. If you are unable to break yours loose with just a ratchet, or feel like you may strip them trying this, then I recommend putting the T-30 bit on the end of an impact driver:
Step 8: Removing the stator
With the stator bolts removed. To remove the stator, all you need to do is pull it straight out.
Step 9: Placing the stator in the new stator cover
Place the stator in the new cover taking the time to line the bolt holes up with the holes in the new cover. Once lined up, place loctite on the stator bolts, screw the bolts in the holes and tighten them up using your ratchet and T-30 torx bit. Make sure the stator wire is on the side of the cover that it needs to be on.
Step 10: Placing the wire bracket in the new stator cover
Place the wire bracket that was previously removed around the wire as pictured below. Once in place, put loctite on the screws and then insert and tighten both screws.
Step 11: Securing rubber wire grommet
With the bracket now in place, you will need to apply silicone to the groove that runs around the rubber grommet and place the grommet in place in the new stator cover. Wipe off the excess silicone and you are ready to put on the new gasket.
Step 12: Installing the gasket
Find the 2 roll pins. If you haven�t already taken them out, you will find them in 2 of the bolt holes in the old stator cover, or in two of the holes on the engine block. Take these pins and place them in the new stator cover as directed by the arrows below. After those are on, place the new gasket on the new stator cover as shown below.
Step 13: Install the new stator cover
Line the roll pins that you just put in the new cover with the appropriate holes on the block and push the cover in place. It may take a little wiggling to get it on all the way. Be sure to keep the gasket and grommet in place as you are putting it on. Remember the magnet when you go to put it on. It will grab the new cover pretty good as you get it close.
Step 14: Put fairing brackets and stator cover bolts on
The last step is to put the fairing brackets and stator cover bolts on with the 8mm socket.
Step 15: Plug the stator wires back in.
If you performed step 6 above, then you need to pull the stator wire back through the bike, route it under the bendy bracket and bend that back in place so that it holds the wire. Then plug it back in. That is it. You are done!
Don�t forget to put oil back in the bike if you chose to drain the oil.
Use heat resistant silicone, like Kawibond, not the stuff you buy at the hardware store to seal a crack in your house.
Originally Posted by riderZeRo
I tried this today but couldn't get that T30 bolts off.
I used an impact driver.
Is there any trick to use the impact driver?
How did you make sure that the cover itself won't move around when you hammer the driver?
I tried this today but couldn't get that T30 bolts off.
I used an impact driver.
Is there any trick to use the impact driver?
How did you make sure that the cover itself won't move around when you hammer the driver?
Originally Posted by Ratkiller
After assembly did your fairings fit tight to the cover, because mine actually touch.
After assembly did your fairings fit tight to the cover, because mine actually touch.

Thread
Thread Starter
Forum
Replies
Last Post
clay7160
PRIVATE For Sale / Trade Classifieds
2
04-06-2007 12:00 AM
Pete
PRIVATE For Sale / Trade Classifieds
0
11-16-2005 10:56 PM

