
Skidplate fabrication

Thread Starter
|
Senior Member
Joined: Mar 2008
Posts: 3,406
From: N. Illinois
1st Gear Member
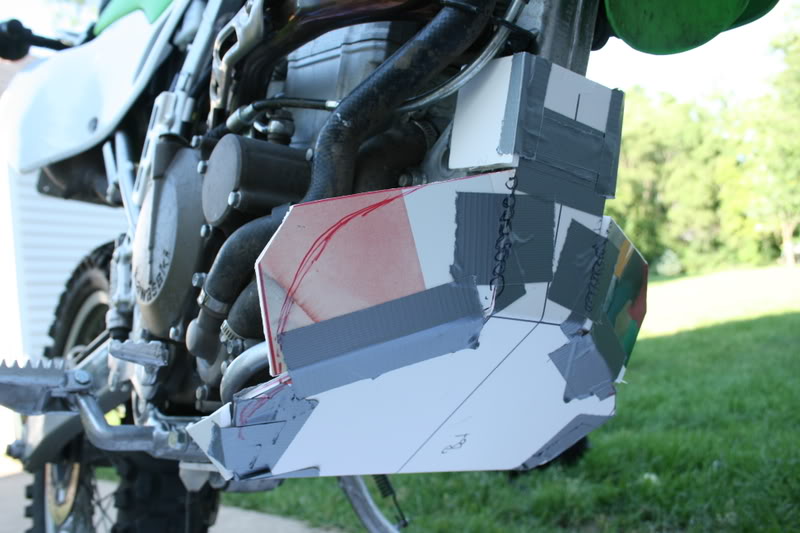
Here are some pictures of my home made skidplate project from last summer. I wanted a skidplate but thought I could make something up myself and save $100. I started by mocking one up made out of foam board. Lots of cutting and adjusting, and then some duct tape to fix mistakes.
Once I had the mock up the way I wanted it, I took it off the bike, then cut, and unfolded it flat. Here is where I hit a roadblock. Calling around to the metal suppliers around me, I was quoted prices of $70+ for the aluminum stock I needed. That's quite a chunk of money to put into a project where one wrong cut or bend can ruin it. I lucked out and ended up getting the piece I needed, for free, from a family friend. He had told me if he couldn't get me a scrap piece big enough I could buy a piece at his shops cost, probably about $20. OK back in business. Next step is transferring the outline from the "unfolded" mock up, to the new aluminum plate.

Once shape is transferred, take a deep breath and start cutting.


Cuts all done. Rigged up some soft jaws for the vise, and started bending.


The best method I found for bending was to pull on the plate while tapping at the bend with a rubber mallet.
Some of the bends took some round about set-ups, to keep the bends straight.


Getting close.

Done except for welding. It is one solid piece of plate, but because of the way it is cut and bent, it had to be welded in four spots, to make it solid.


Here it is after the weld job, another favor from the same guy that got me the plate.

I couldn't decide if I wanted holes in it, but finally pulled the trigger and used a hole saw to ventilate that sucker.

Clean green on green.

Once I had the mock up the way I wanted it, I took it off the bike, then cut, and unfolded it flat. Here is where I hit a roadblock. Calling around to the metal suppliers around me, I was quoted prices of $70+ for the aluminum stock I needed. That's quite a chunk of money to put into a project where one wrong cut or bend can ruin it. I lucked out and ended up getting the piece I needed, for free, from a family friend. He had told me if he couldn't get me a scrap piece big enough I could buy a piece at his shops cost, probably about $20. OK back in business. Next step is transferring the outline from the "unfolded" mock up, to the new aluminum plate.
Once shape is transferred, take a deep breath and start cutting.
Cuts all done. Rigged up some soft jaws for the vise, and started bending.
The best method I found for bending was to pull on the plate while tapping at the bend with a rubber mallet.
Some of the bends took some round about set-ups, to keep the bends straight.
Getting close.
Done except for welding. It is one solid piece of plate, but because of the way it is cut and bent, it had to be welded in four spots, to make it solid.
Here it is after the weld job, another favor from the same guy that got me the plate.
I couldn't decide if I wanted holes in it, but finally pulled the trigger and used a hole saw to ventilate that sucker.
Clean green on green.
Member
1st Gear Member
Joined: Dec 2008
Posts: 43
From: Mississauga, ON, Canada
Very nice work dan888! Keep the mock up card-boad. You can probably trace it onto architectural tracing paper (we call it trash paper, the really thin stuff), put it in an envelope and sell it to guys like me who are now inspired.
have a great day
have a great day
Member
1st Gear Member
Joined: Jan 2009
Posts: 78
From: Raleigh, NC
Excellent job...looks "store bought" from where I sit. If your day job doesn't work out maybe there's a future for you in fabrication.
I was toying with doing something similar. I have access to scraps of 3/16" aluminum diamond plate where I work. Probably nothing big enough to make a skid plate out of a single piece but since it's got to be welded why not multiple pieces?
I see where you bolt the skid plate to the downtube, but am curious where you attached to under the engine/frame?
If you ever decide to trace the pattern onto a large piece of paper and would like someone to make a CAD drawing of it so you can post it for others let me know. I do that kind of stuff for peanuts, KLX parts, good friends to ride with, and occasionally for work...!
Thread Starter
|
Senior Member
Joined: Mar 2008
Posts: 3,406
From: N. Illinois
1st Gear Member
Thanks all. I was happy with the way it turned out. I toyed around with the idea of making up a few more to sell. I would have to partner up with the guy I got my material from for the welding and raw stock though. Kmac the skidplate mounts in the back using the same two threaded holes that the original skidplate mounts to.
Dan
Dan
