
How to Wire DRC Edge2 led taillight


Thread Starter
|
Member
1st Gear Member
Joined: Jun 2013
Posts: 39
From: New York City
So I just got the drc edge2 led taillight and turn signal holders included. I have no idea what I am looking at lol and I don't know how to wire this up. Any DIY threads ? Pics ? Instructions ?
Senior Member
Joined: Apr 2013
Posts: 279
From: Blackburn, England
1st Gear Member
I've got a couple of pics that may help you out, which I will upload shortly.
Senior Member
Joined: Apr 2013
Posts: 279
From: Blackburn, England
1st Gear Member
So first i removed the rear fairing, unbolted the stock break light.
Once all that had been removed I placed the edge tail light into position marked down where the holes needed to be drilled in to bolt it to the frame as my tail light didn't have the holes per drilled.
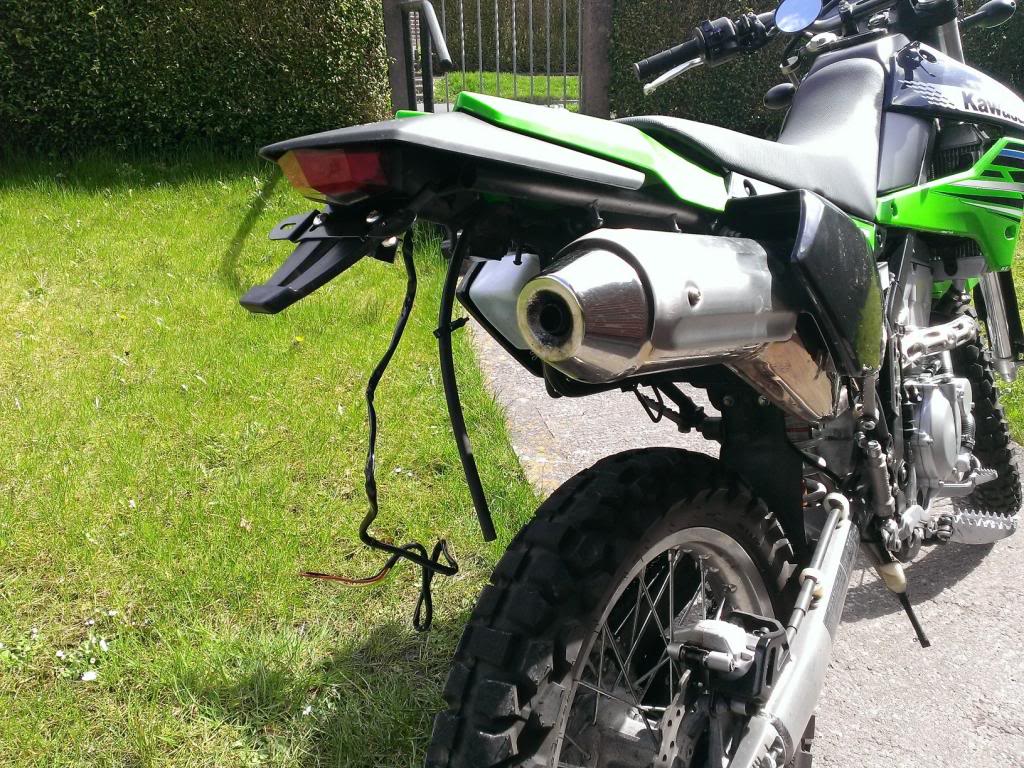
As you can see the brake light wires are quite lengthy, I cut this a lot shorter.
If you do this make sure you cut bits off at a time and not too much.
This then needed to be fed up from behind the tail light through the largish hole that's in the plate.
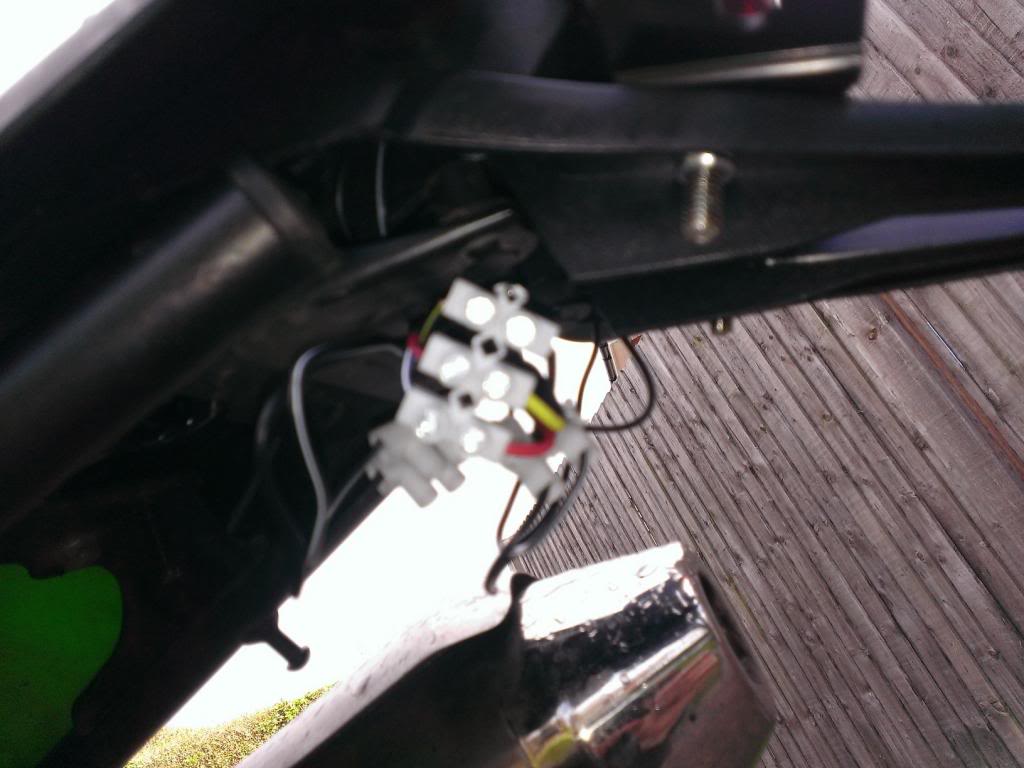
You can then rewire the cable from your old brake light to your new one.
I know the camera quality isn't too good on this pic but you get the idea.
Using that type of a connector was just a temporary job until I could get down to maplin to get some heat shrink wrap to give a much tidier sturdier finish.
As for the indicators, I drilled a hole in either side of the tail light and sat them there.
Hope this helps I'm sure others will give you a few more pointers.
If you need any more pics etc I'm sure I can get some for ya..
Once all that had been removed I placed the edge tail light into position marked down where the holes needed to be drilled in to bolt it to the frame as my tail light didn't have the holes per drilled.

As you can see the brake light wires are quite lengthy, I cut this a lot shorter.
If you do this make sure you cut bits off at a time and not too much.
This then needed to be fed up from behind the tail light through the largish hole that's in the plate.
You can then rewire the cable from your old brake light to your new one.
I know the camera quality isn't too good on this pic but you get the idea.
Using that type of a connector was just a temporary job until I could get down to maplin to get some heat shrink wrap to give a much tidier sturdier finish.

As for the indicators, I drilled a hole in either side of the tail light and sat them there.
Hope this helps I'm sure others will give you a few more pointers.
If you need any more pics etc I'm sure I can get some for ya..
Senior Member
Joined: Aug 2011
Posts: 516
From: Phuket, Thailand
1st Gear Member
It gets damp under there with a lot of vibration.....beware! 
Use good quality crimp connectors or even better twist, solder & shrink cover for a permanent job!
My mate did a quickie half *** connection job & he had problems after 6 months & had to re-wire it again properly!!
Use good quality crimp connectors or even better twist, solder & shrink cover for a permanent job!
My mate did a quickie half *** connection job & he had problems after 6 months & had to re-wire it again properly!!
Senior Member
1st Gear Member
Joined: Jul 2012
Posts: 102
From: Socal
I scrapped my oem connectors off of the tail and turn signals then attached them to the edge 2 tail light and the DRC turn signals. It made plugging them into the wiring harness a lot easier. My buddy told me that I should save the oem lights but I feel like everyone with a KLX250S has these parts in a bucket in the garage, if I need them I will post up. Good Luck.
Senior Member
1st Gear Member
Joined: Jul 2010
Posts: 145
From: Pittsburgh, PA
Hey man sorry to hear you are having trouble. My drc edge 2 kit was pretty easy. I just cut the stock connectors off of the stock fender and used the instruction manual on the drc kit to know which wires to connect to which. I soldered and shrink wrapped them and Ive never had an issue. Wish I saw this earlier, I just added turn signals because I thought the integrated ones were too hard for cars to see I coulda taken pics and made a tutorial if i saw this 2 weeks ago.
Also the klx specific edge kit i got off 12 o'clock labs website pit perfectly I didn't have to drill or change any mounting hardware.
Also the klx specific edge kit i got off 12 o'clock labs website pit perfectly I didn't have to drill or change any mounting hardware.
Last edited by Lawnica1; Jul 23, 2013 at 03:00 AM.
Senior Member
1st Gear Member
Joined: Jul 2010
Posts: 145
From: Pittsburgh, PA
TIPS:
Put shrink wrap on before soldering and keep it a few inches away other wise heat from solder will cause it to prematurely shrink.
Do one set of connectors at a time so you dont mix up left and right turn sigs like I did the first time. On side has a black connector and one has a grey
If you add turn signals on top of the integrated lkights I recommend wiring them in parallel so the LEDs are as bright as possible
Leave extra length on the stock connectors you cut off so they can be reused multiple times if you end up getting new turn sigs at some point
Senior Member
1st Gear Member
Joined: Mar 2011
Posts: 854
From: Northern Utah
TIPS:
Put shrink wrap on before soldering and keep it a few inches away other wise heat from solder will cause it to prematurely shrink.
Do one set of connectors at a time so you dont mix up left and right turn sigs like I did the first time. On side has a black connector and one has a grey
If you add turn signals on top of the integrated lkights I recommend wiring them in parallel so the LEDs are as bright as possible
Leave extra length on the stock connectors you cut off so they can be reused multiple times if you end up getting new turn sigs at some point
Put shrink wrap on before soldering and keep it a few inches away other wise heat from solder will cause it to prematurely shrink.
Do one set of connectors at a time so you dont mix up left and right turn sigs like I did the first time. On side has a black connector and one has a grey
If you add turn signals on top of the integrated lkights I recommend wiring them in parallel so the LEDs are as bright as possible
Leave extra length on the stock connectors you cut off so they can be reused multiple times if you end up getting new turn sigs at some point
There *IS* a poor-man's way of doing it as well, which I have had very good success with; you do the old twist and solder routine but before sliding the heat shrink over the joint, run a fine bead of hot-melt glue (about the same length as the tubing piece you're using) over the joint... start on the insulation of one wire, go over the joint, and end on the insulation on the wire on the other side. Wait a few minutes for the bead to cool, THEN slide the shrink tubing over it, and heat as usual. This makes an amazingly water-tight joint that is NOT going to go flaky on you in a few months.